How Ryan Haigh designed 3D-printed toy figures in Plnty
Ryan Haigh designed a set of pocket-size toy monsters in Plnty, in the spirit of the M.U.S.C.L.E. Men figures Ryan had as a kid.
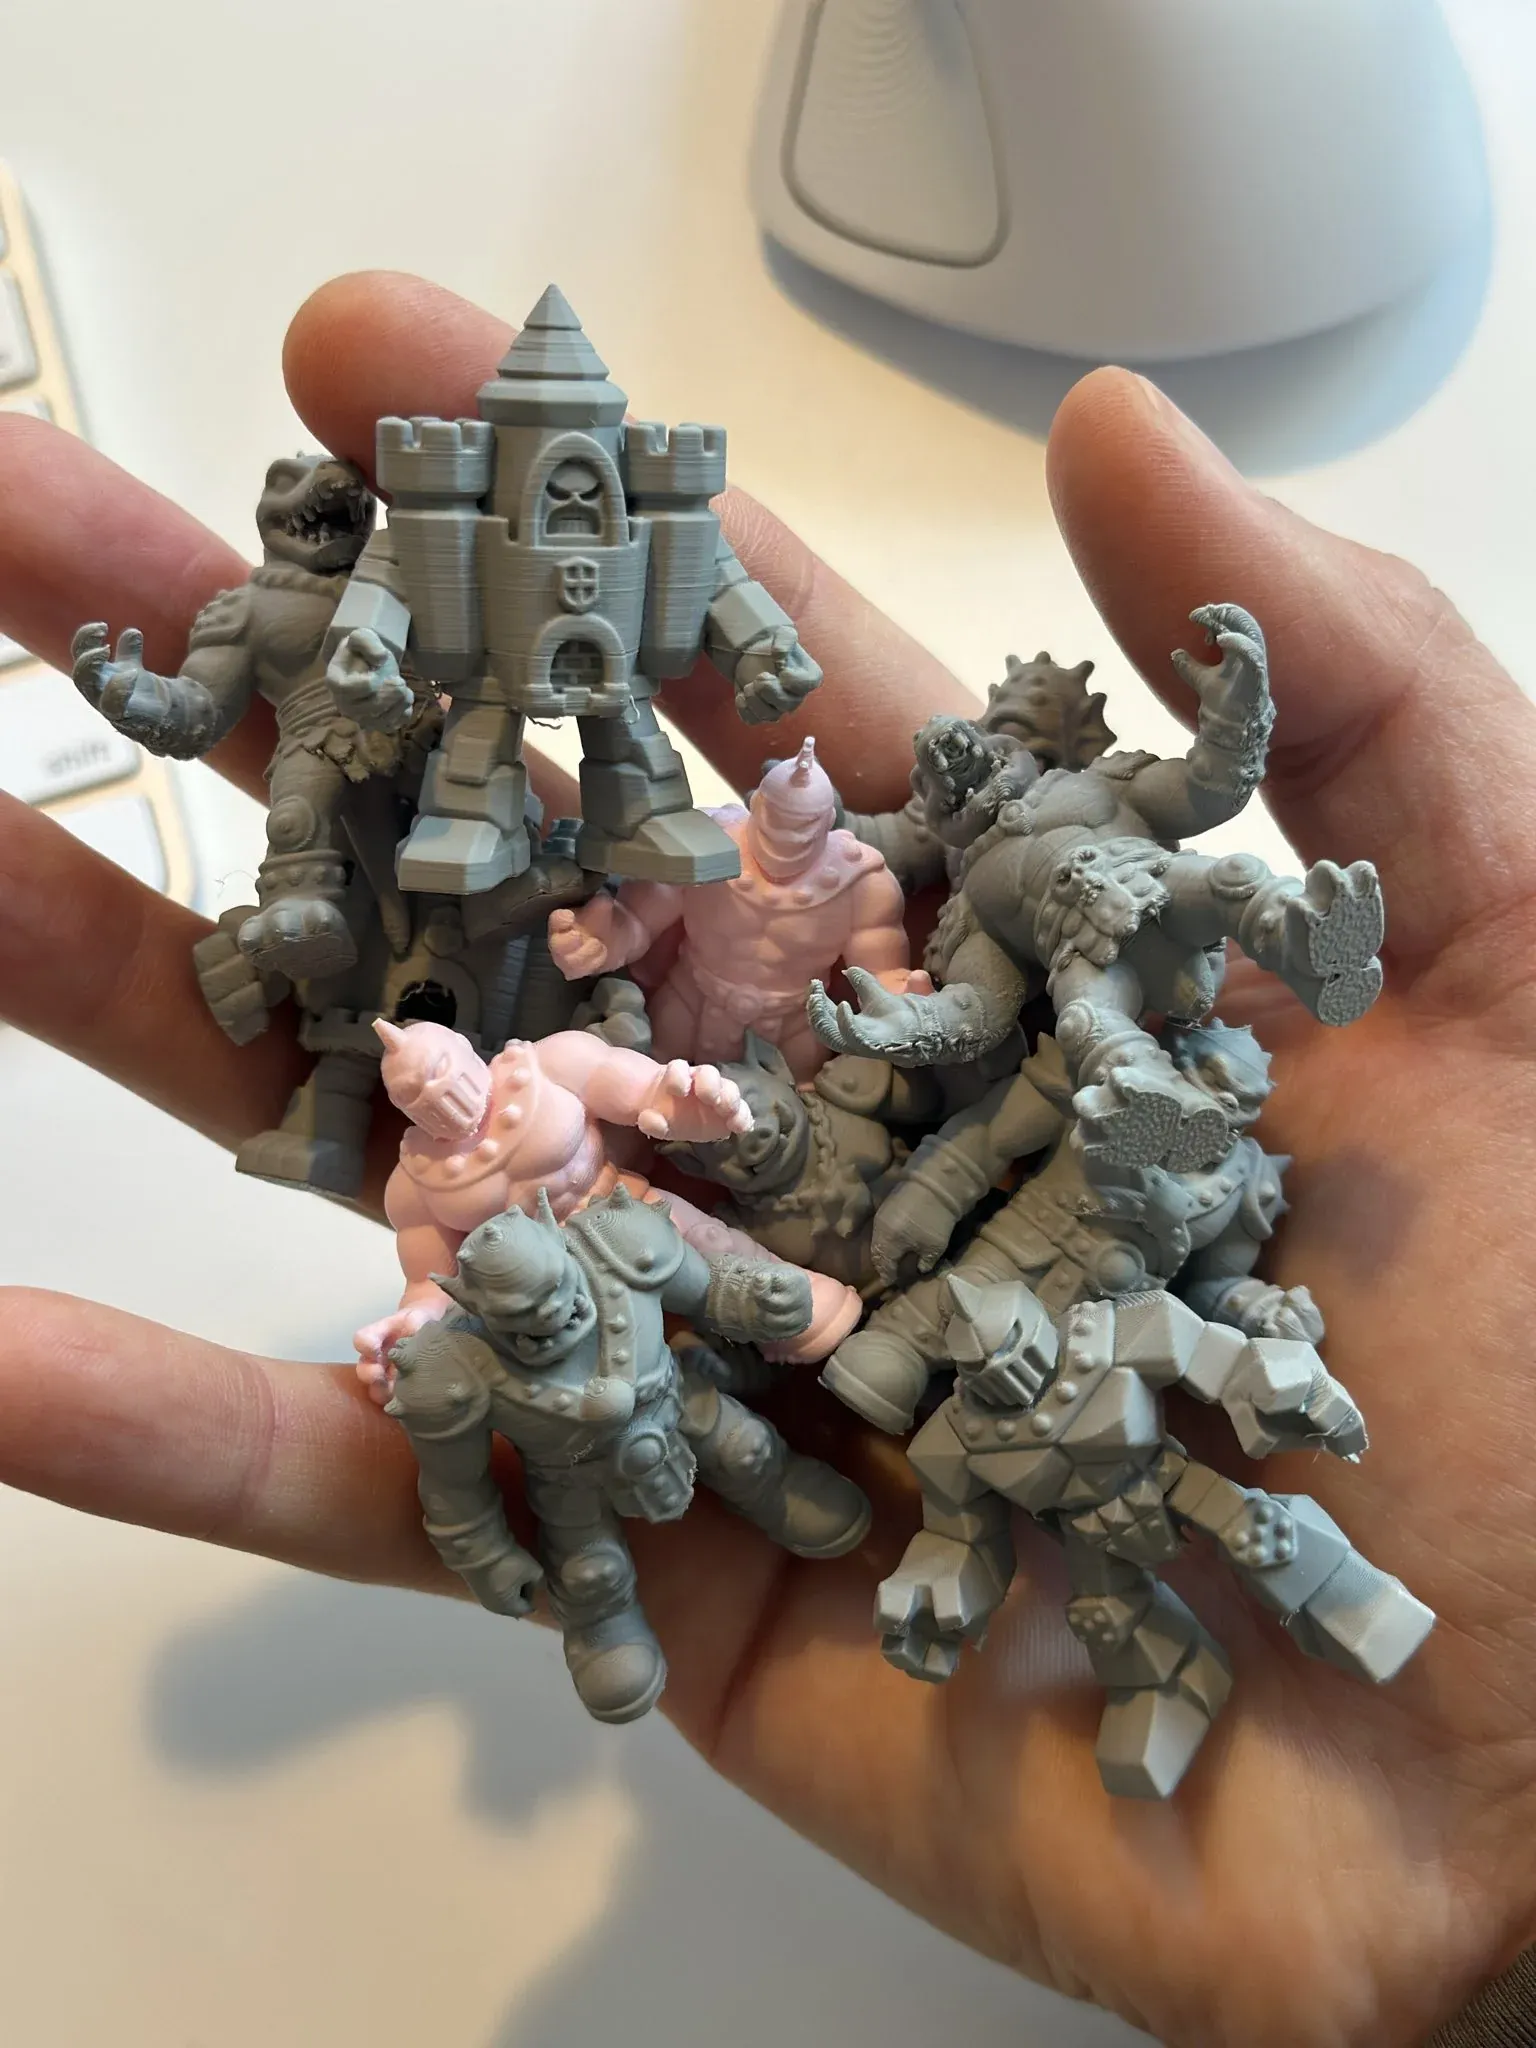
The first three characters and their front, side and back views took about nine hours, and by 9 October about ten of them stood 3D-printed in Ryan's hand.
01 / Ryan Haigh
New age M.U.S.C.L.E. Men
Ryan Haigh is a designer who builds with AI, and the figures began with a page in an old case study: renders of dissected toys, made a year earlier, that went back to the figures of Ryan's childhood. "Small, strange characters with enough personality to make a whole world out of a handful of them," Ryan's article remembers. "I wanted to make a few of my own." On 2 October those renders went onto a Plnty board beside photos of the real toys, as references for new characters that would not copy the old ones. By 6 October the board held fifteen front views of about eleven characters, each with a side or a back view, and the first post on X had gone up the same afternoon it started.
Transcript
Ryan, 0:00. I'm going to show you how I made these figures in case it's helpful, because I actually switched between three different AI tools to get them done. This is a page from a case study presentation that I put together as I'm interviewing for roles. I actually made it a year ago. I made these outputs with Gemini, and what I wanted to do is make a few more of them. It's a play on a dissection of my works.
Ryan, 0:28. It harks back to my childhood. These were figurines that I had when I was young. I just thought it was cheeky and fun. Let's jump into Plnty. What I did within Plnty was I took the renders that I made a year ago, and then I took some additional references of the actual muscle men, all the different figures, because I wanted to create new and unique figures that didn't look exactly like these that I had already created.
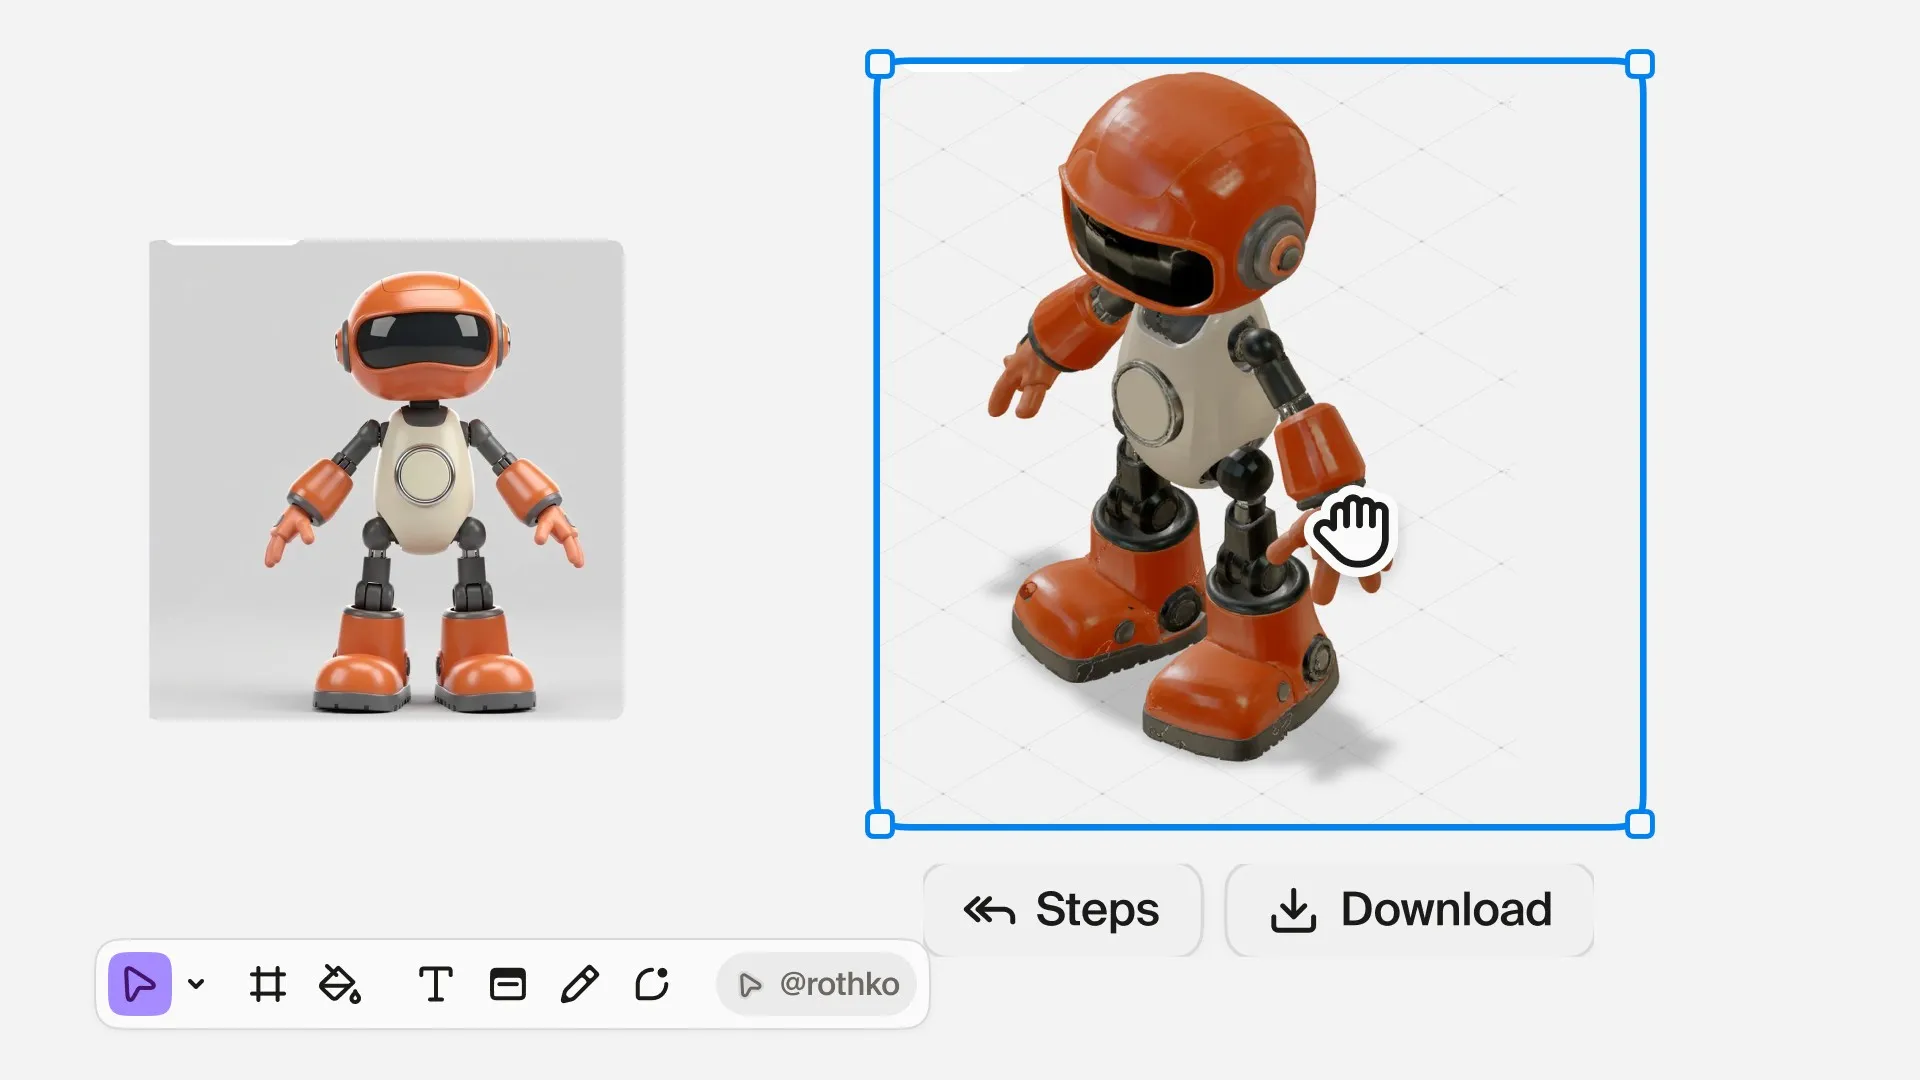
Ryan, 1:00. This is one of the first examples of what it was able to put out. They have this really interesting tool, Rothko, and it just was released. Basically I can select all these photos. I can say to Rothko, I want to generate a new image from these references in one-by-one aspect ratio. You basically type to it. Their UI is fantastic. Their tools are amazing, great way of informing people how to use different features within a given service.
Ryan, 1:42. That's really intelligently done by their team. They do have tutorials as well, but this just feels like a much more natural extension of learning how to do something. It's basically taking my requests. It will write out the prompt. It will select the aspect ratio settings, which you can see is happening right there. It basically drops a note when it's done, and it lets you run it.
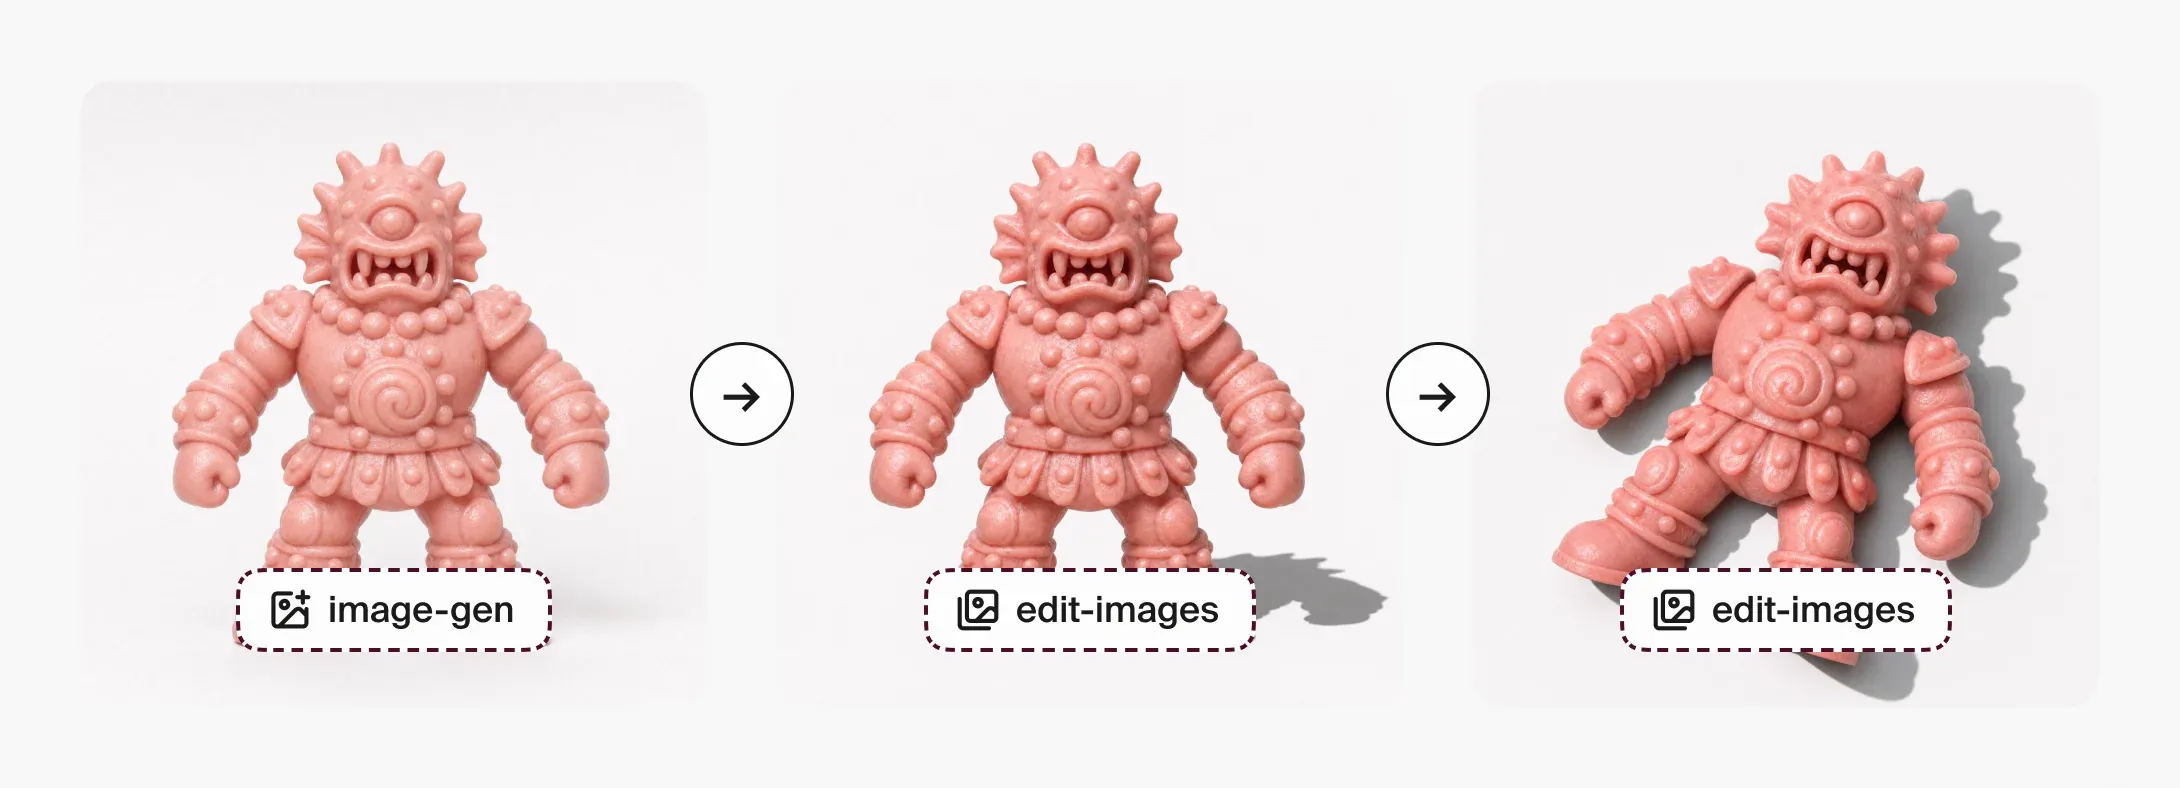
Ryan, 2:07. It doesn't want to spend your credits for you, which is nice, but let's just run it. You can choose the creativity style. Let's just do bold. Why not? While that's going, I'll show you guys some additional stuff. For this, it wasn't quite the camera angle or the intent that I wanted. I wanted the figurine to be on its back through a series of different steps. You can see these steps here.
Ryan, 2:33. You can see that I went ahead and I asked for edits from this to this to this, and then you can actually recreate those steps as a chain, which is another really interesting feature. You might get an output, and I did. I got a couple more outputs here and here that are very similar to this, and then you can try to recreate the steps that got to the final thing that you are happy with by using that particular chain.
Ryan, 3:01. I did try the chain in a few instances, and it was able to come up with this and this. It came up with this option too. Those all got much, much closer to what I was actually intending. As I got to a few of these, I wanted to change the color. This one, for instance, I wanted to remove the arm off of it. What I've been doing is I'll download them, I'll drop them into ChatGPT because I've been getting way better results in the ChatGPT app for changing color and changing some of the aspects of popping off arms and doing certain things like that, but what happens is when you download those, you basically, I'm going to come back to Plnty, you get a render, an output I should say, that is smaller.
Ryan, 3:52. Here's another example. This was one of the versions that I downloaded from ChatGPT, but then what you can do is you can use their image upscale. I can basically select that tool, drop this in, choose 2X, 4X. I have been using Topaz Bloom, Bloom 2, and Bloom Realism. They just, in my opinion, have been the best at figuring out how I want these things to look and feel. A lot of these little imperfections on the figurines, I kind of liked.
Ryan, 4:24. I didn't want them to feel perfect. These were 4X outputs from the upscaler. From there, you can do remove background if you wanted to. It's another really simple, easy tool. I just hit it, so it's working on it right now. One of the other fun tools that I have leveraged is their macro style. Basically you can select one of these close-ups. You can drop in one of these images. Let's do this actually, because this one has a thing on the foot where I made an indented RY Toys.
Ryan, 5:01. The remove background is done. It's very clean. It does a great job actually getting you to a point where you could have a transparent PNG really easily. I lose the shadows, so that's not my intent. That's not what I wanted. But in certain cases, this can be really quick and helpful for a lot of your creative needs. Then close-ups are going to take a while, so we're going to pause here for a second, and then we'll show you what the end result looks like in a second.
Ryan, 5:29. These are ready. Let's just pull these over. Get a nice close look at these. They're insanely detailed. It's really fun to see what it's proposing. The actual textures are on these objects. I could actually bring in the image upscaler and then upscale these even more if I wanted to with the Topaz model that I've been enjoying. Yeah, a lot of fun tools on here. I do have some upgrades, or invites I should say, so if you are interested in trying out some of the stuff that they have, just shoot me a DM and I'll try to add a few of you guys.
Ryan, 6:10. That's it. Have fun. Happy building.
02 / How it was made
From a request to the first figure
The first runs that afternoon did not work. Ryan's own words on the image-gen card, "Create a new figurine, hard light, hard shadow, monochromatic toy, dissected", went out seven times and came back with an error each time: one reference, a lineup photo 925 pixels wide and 285 tall, pulled the picture's shape past the model's limit of three to one. Ryan selected the references and asked Rothko, the assistant on the board, for a new image from them, square. Rothko filled the image-gen card, wrote the prompt and set the shape square, and the run that followed came back as the first figure, a crowned fish king in pink plastic. "It's basically taking my requests," Ryan says in the walkthrough. "It will write out the prompt. It will select the aspect ratio settings." The run itself stays with the person: "It doesn't want to spend your credits for you, which is nice."
Three steps, saved as a chain
The fish king came back standing, and Ryan wanted the figure lying on its back, so it took two more edits on the same card: "Figuring out back-on-surface hard shadow", then "Figure needs to be on the surface, on the back, not standing, hard shadow". Plnty keeps every result's steps, and a result's Steps rebuild into a chain that runs the same words on a new picture. Ryan rebuilt these three and ran them on two new figures, the cyclops and the boar warrior. "Those all got much, much closer to what I was actually intending," Ryan says of the results.
Start with three views
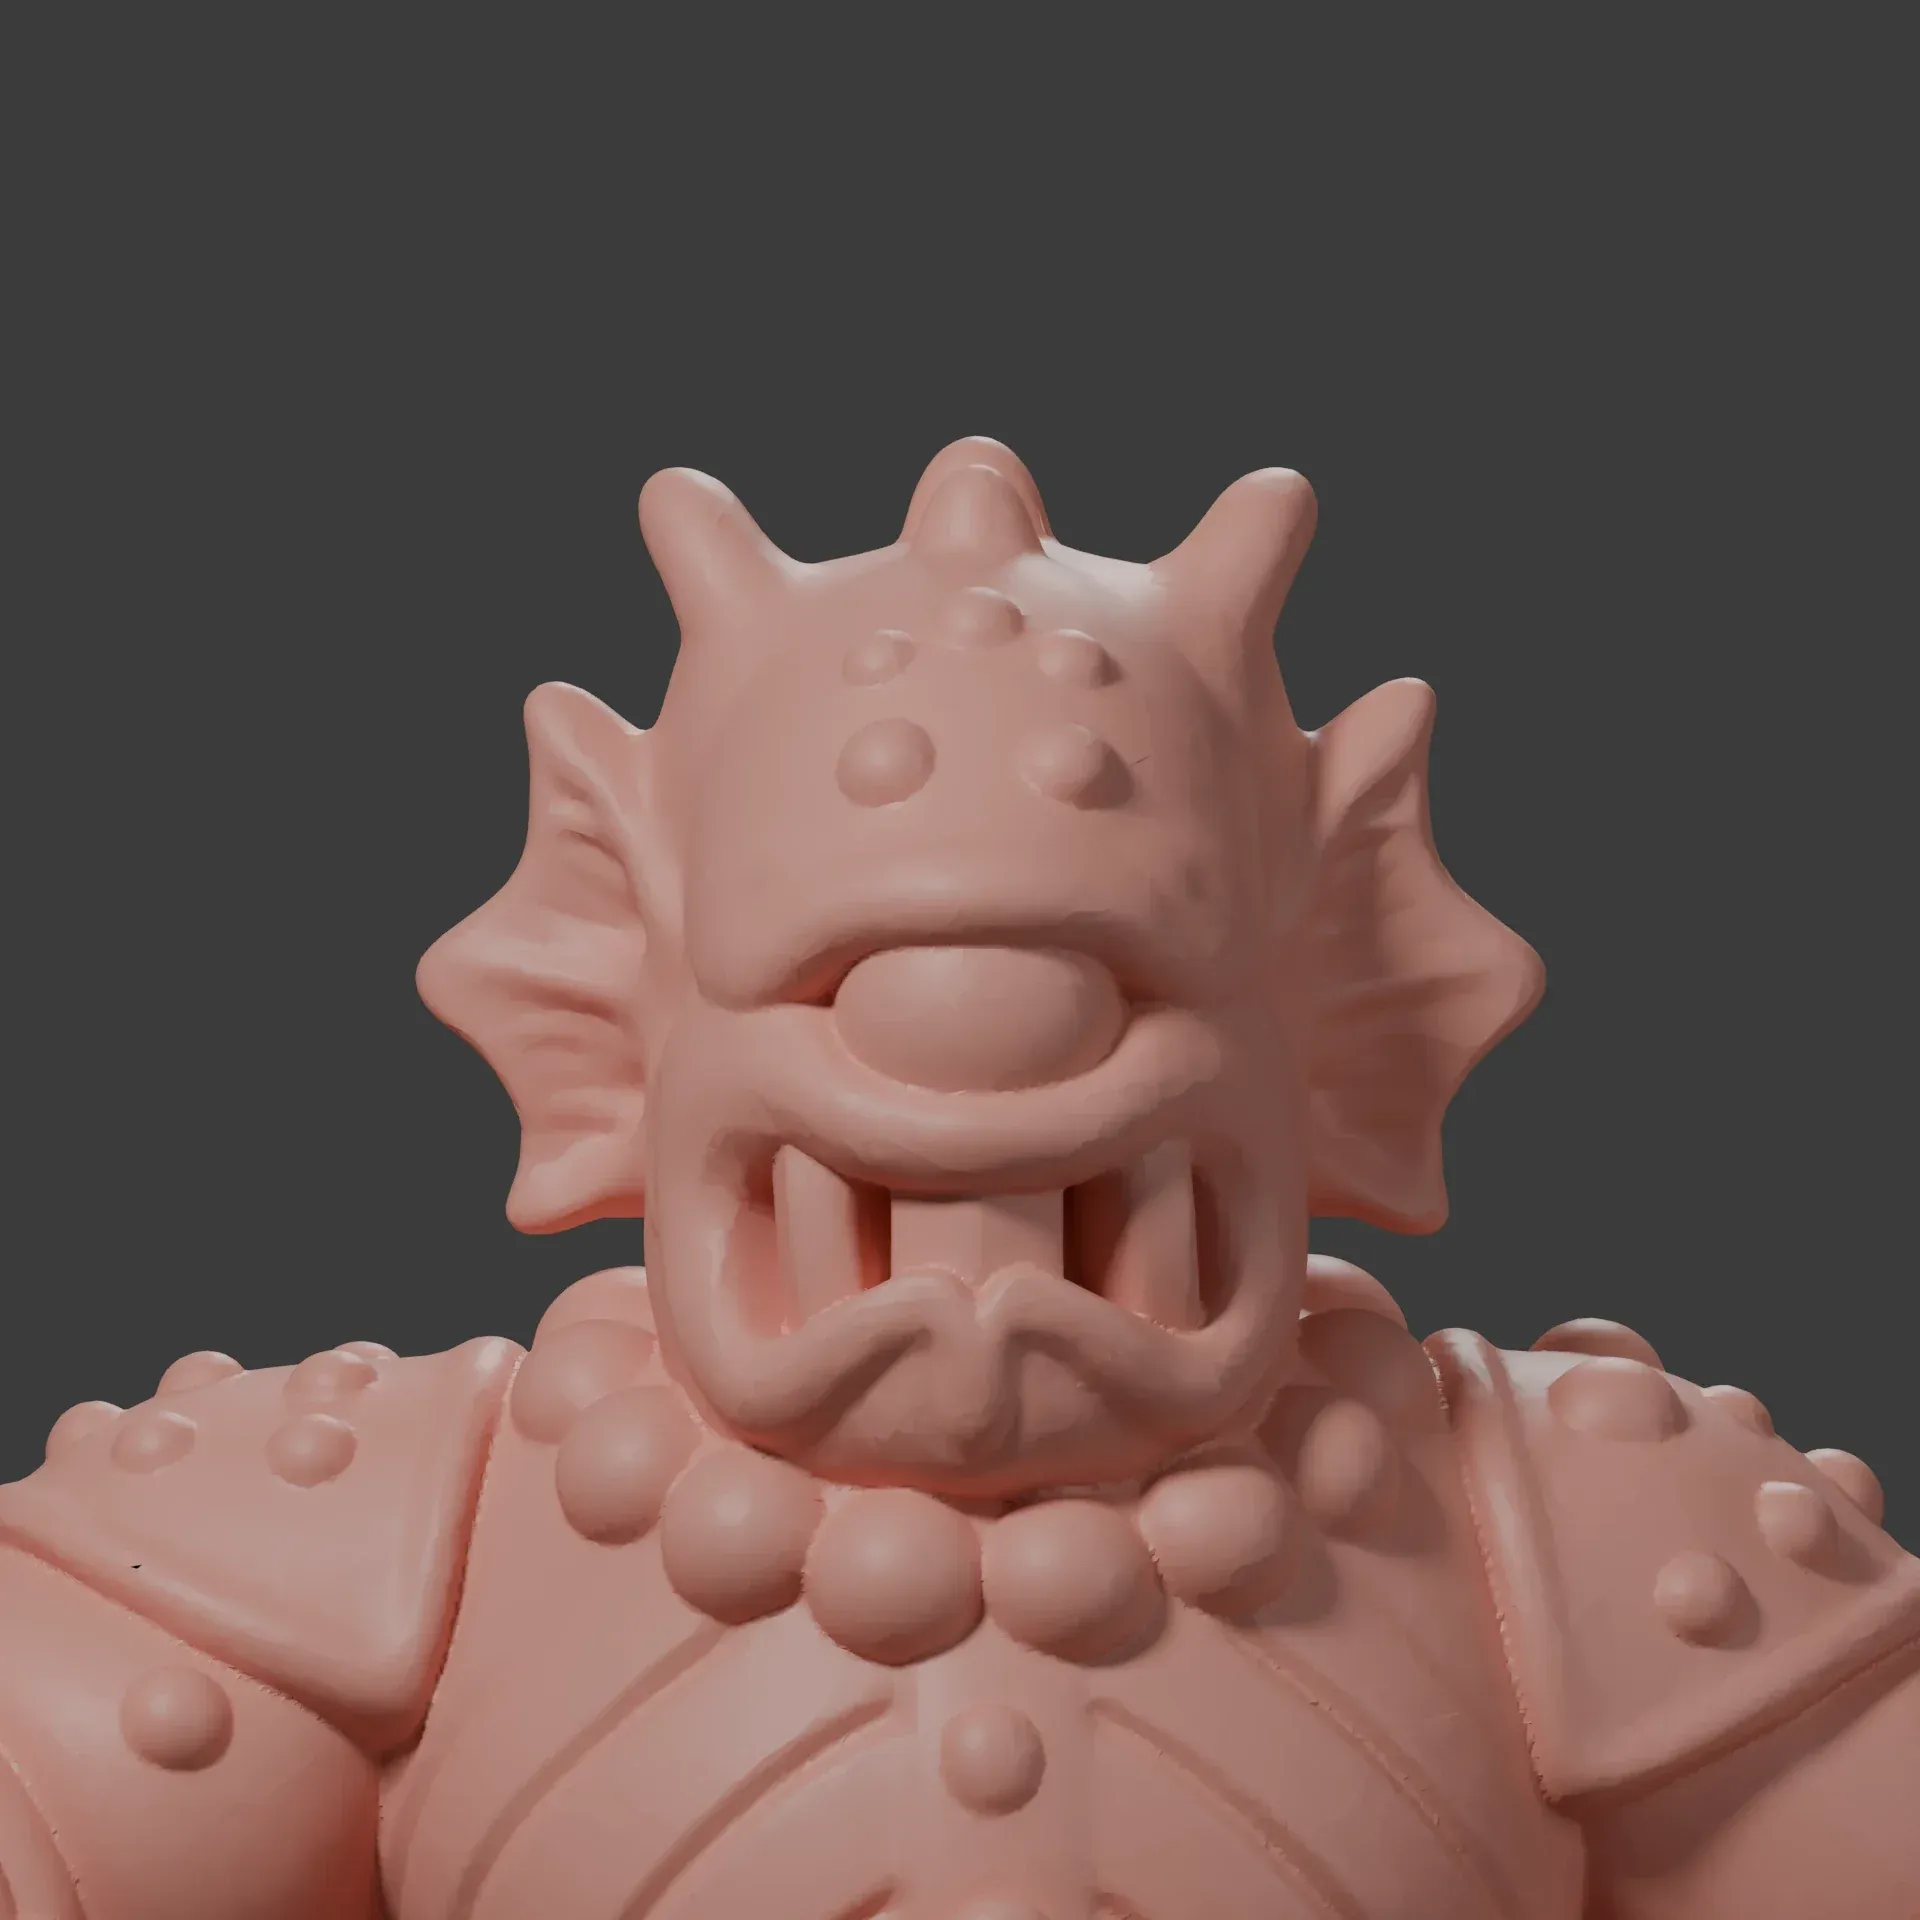
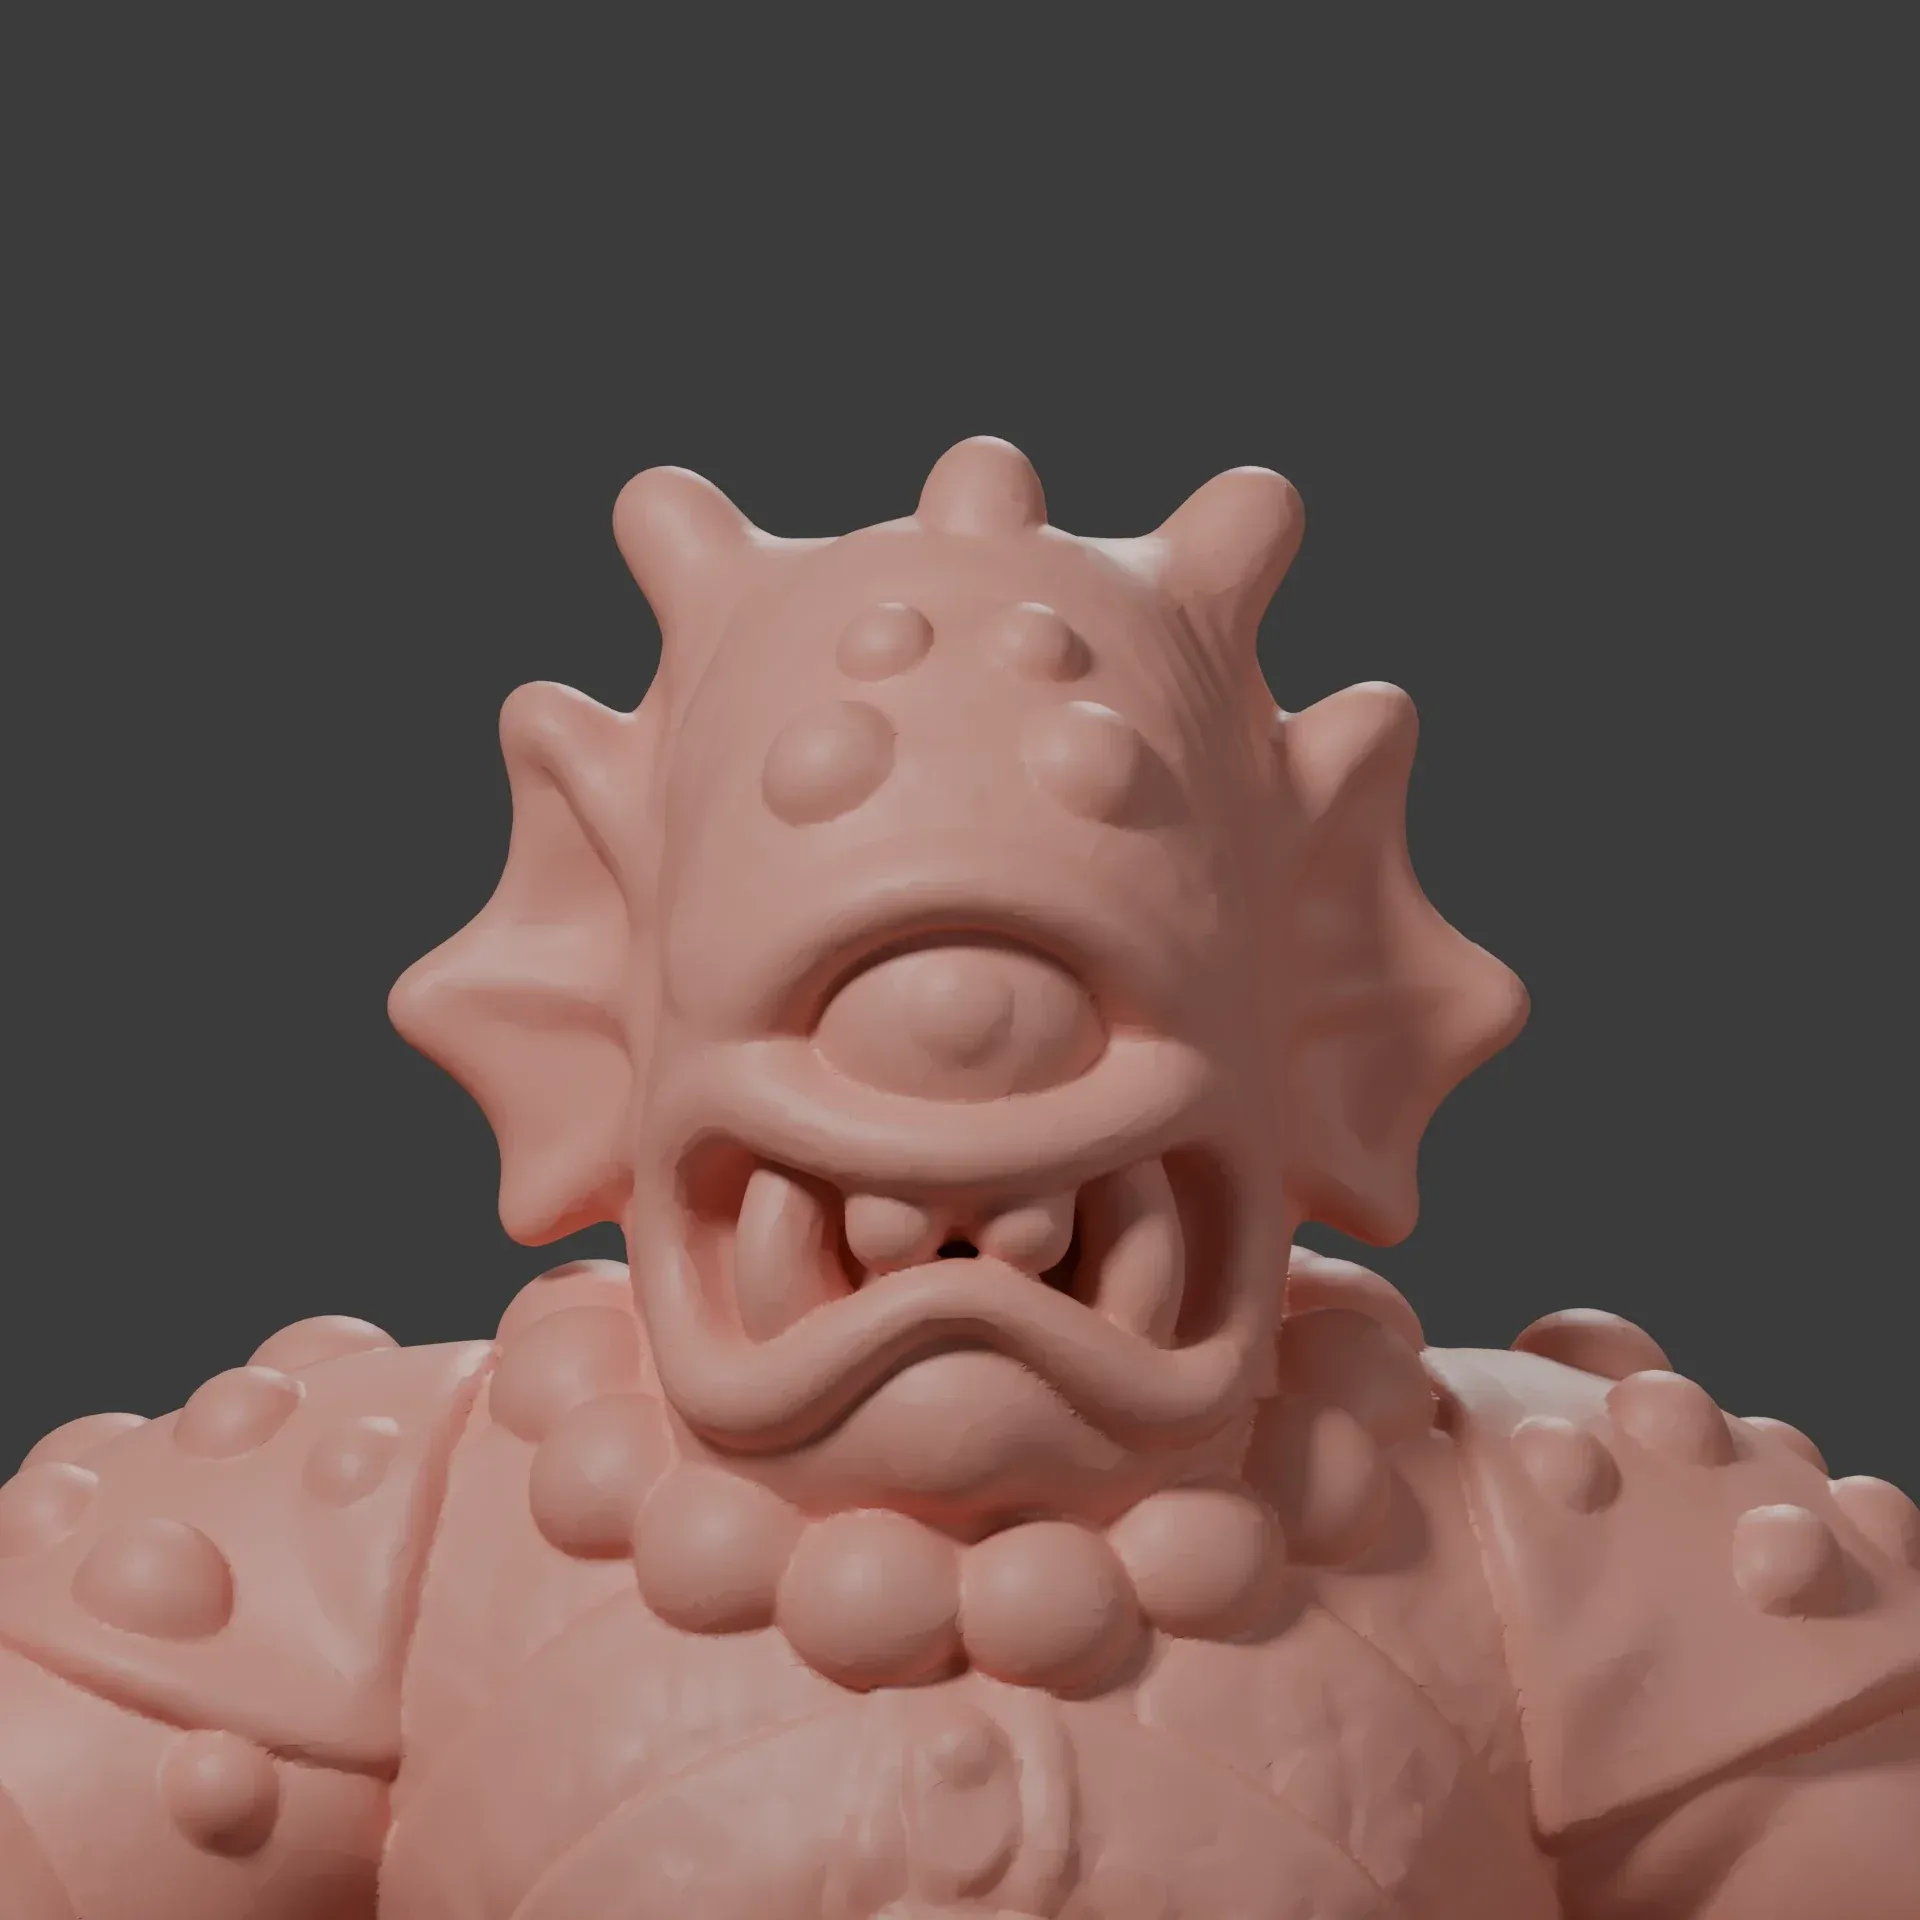
A print needs more than a front. Ryan made each character's side and back on the image-gen card, given the front and two words, "side profile" or "back profile", so every view starts from the same figure. "The views need to agree on the things that define the character: its pose, proportions, clothing, head shape, and accessories," Ryan's article explains. The fish king, the boar warrior and the cyclops went from the board to Meshy as three views each, and the article shows the fish king's and the cyclops's file for file.
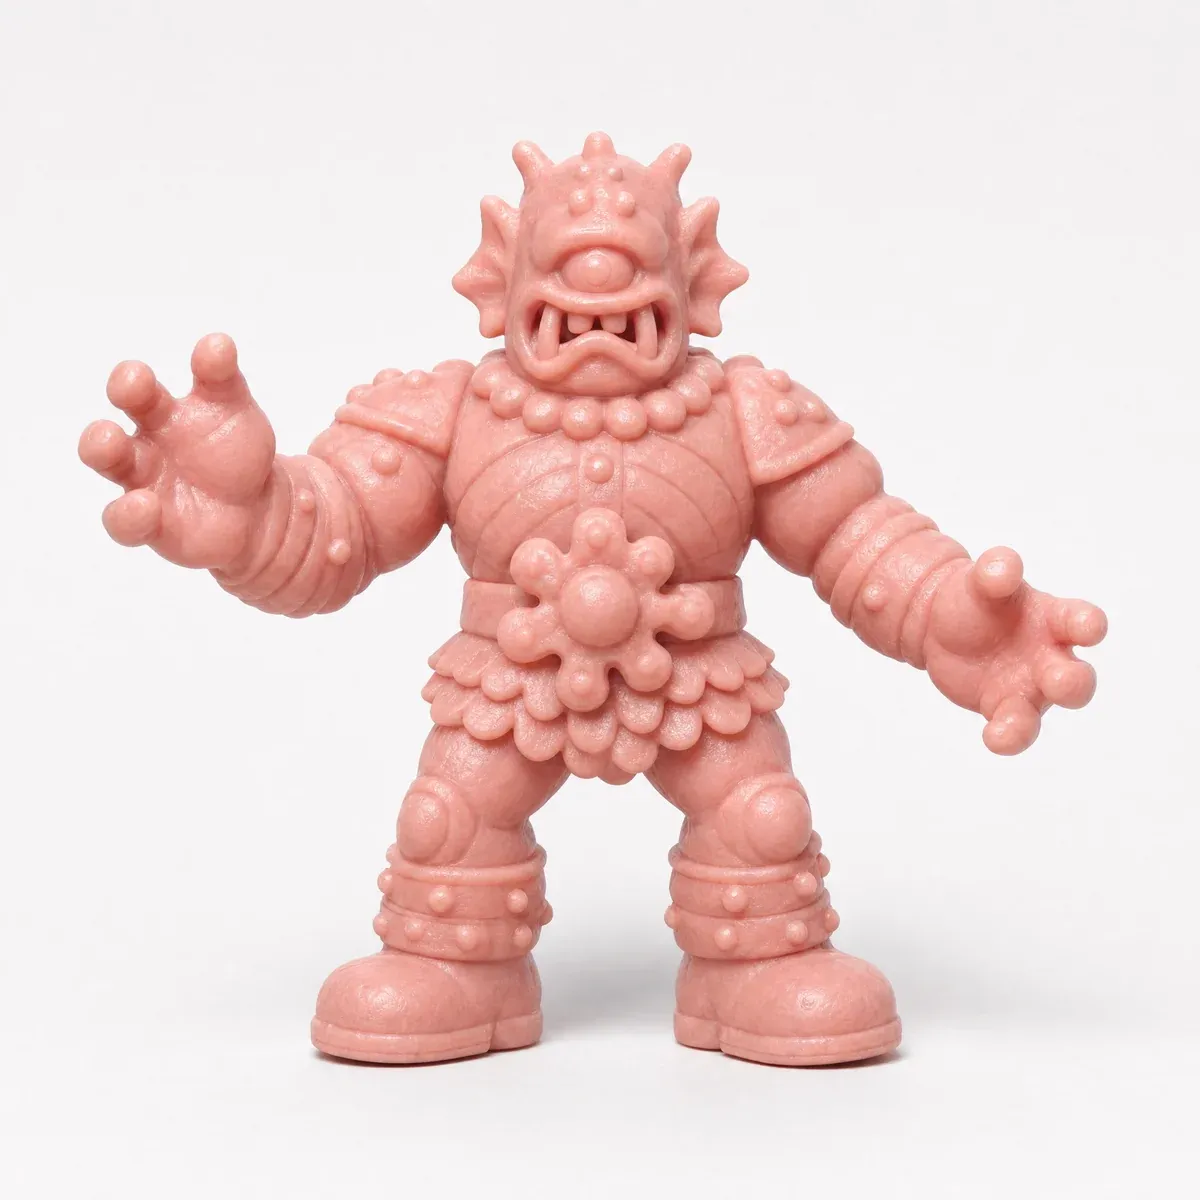
Frontimage-gen, from Rothko's words 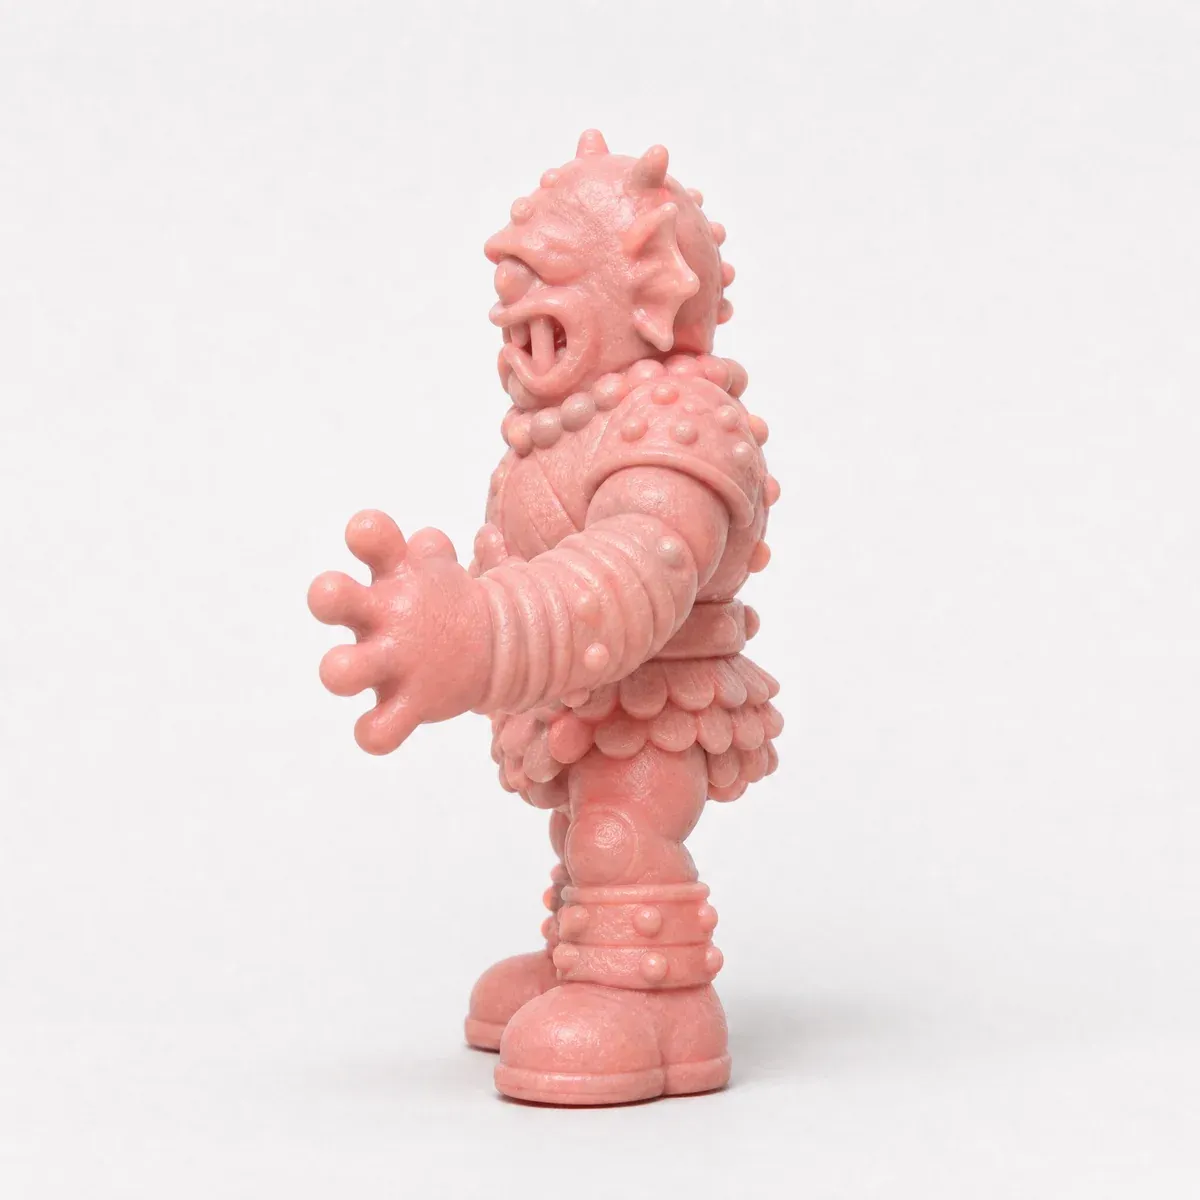
Side"side profile" 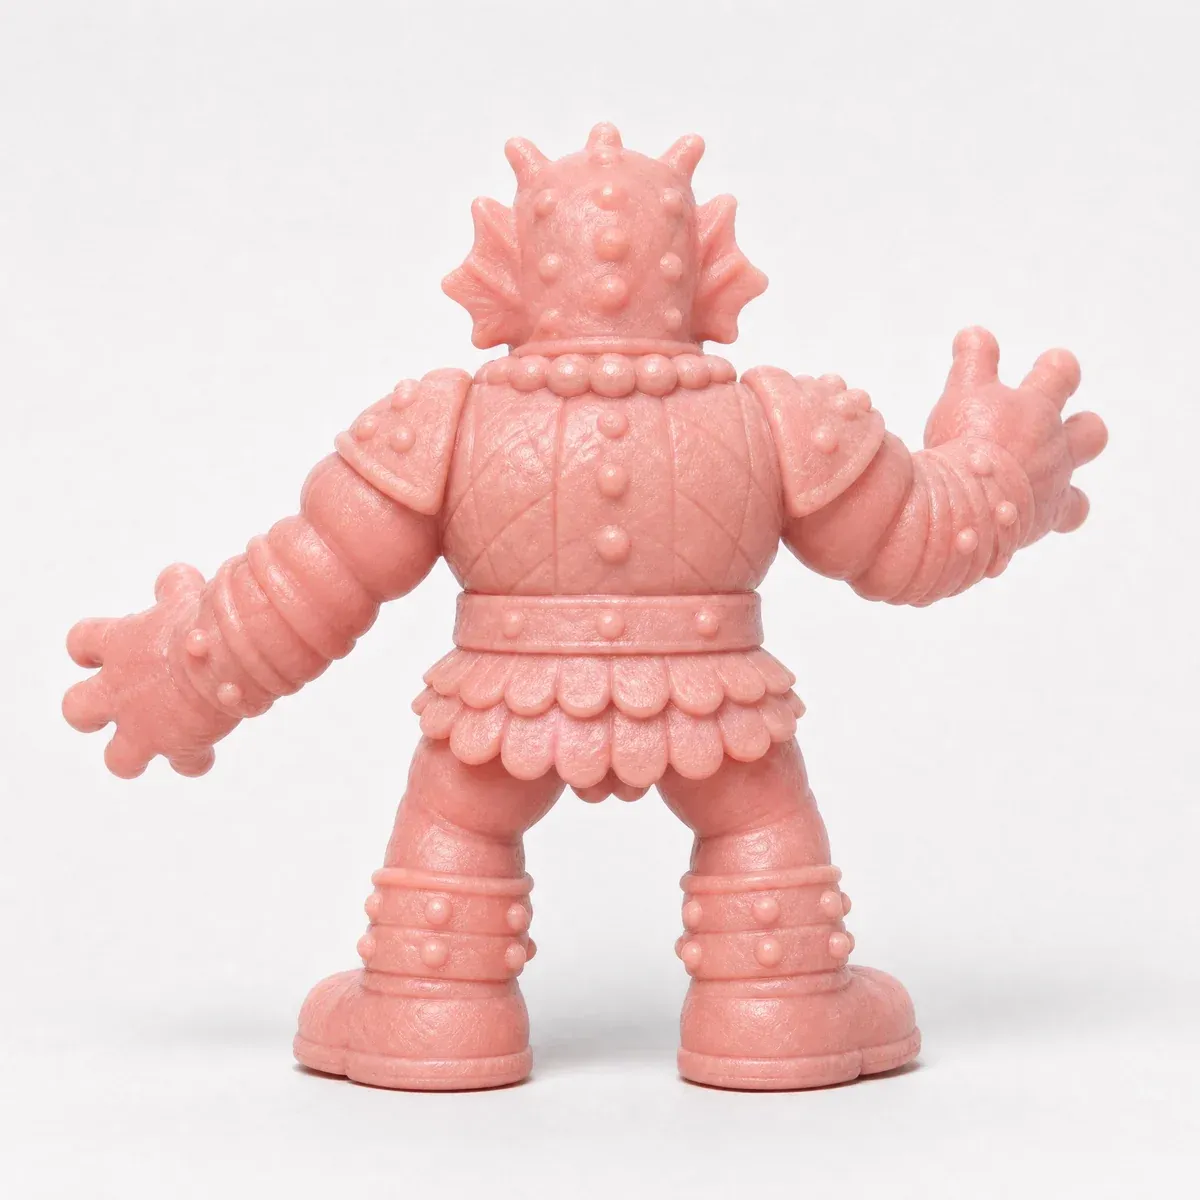
Back"back profile" 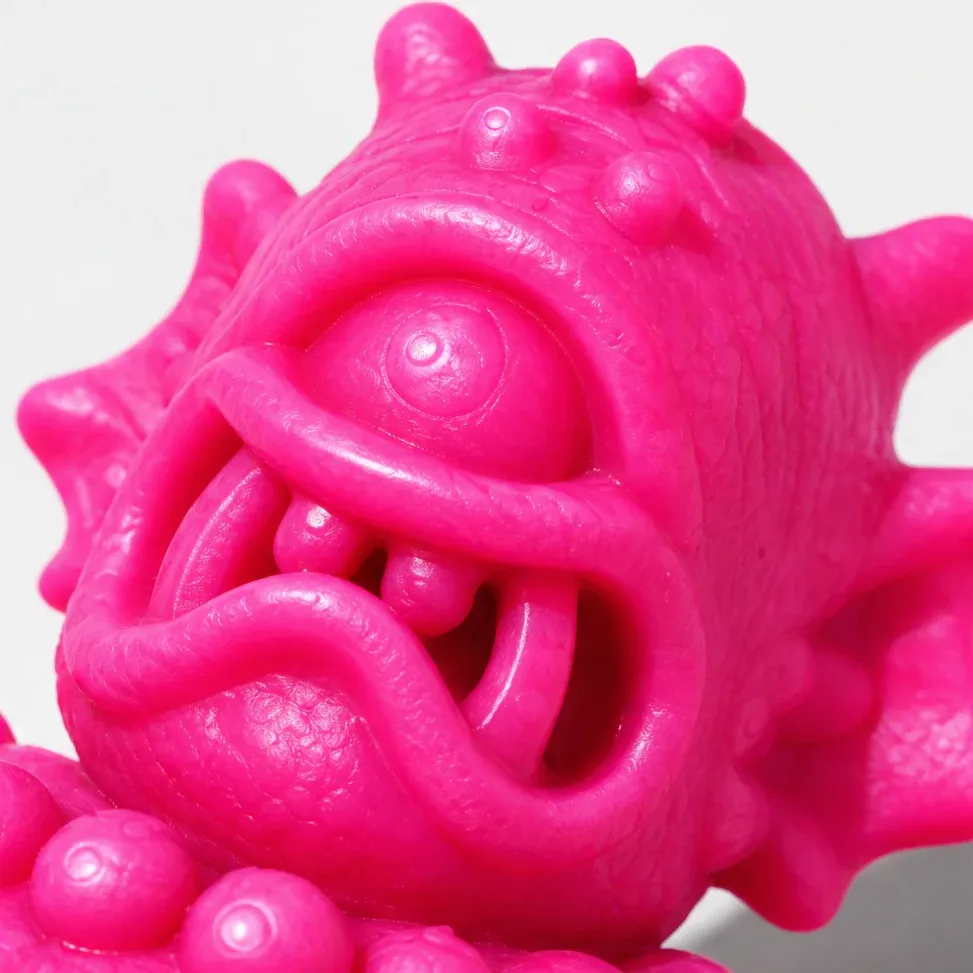
Face close-upclose-ups, on a hot pink recolor
Close-ups the mesh could read
Three views carry the shape, and small parts can still come out flat: the cyclops's first mesh had the right silhouette and a plain dome for an eye. Ryan had close-ups of that figure from the close-ups tool, which pulls framed detail out of a picture, made on a hot pink recolor brought back from ChatGPT. In the article's test the face close-up went to Meshy as a fourth reference, and "the face close-up did the most. All three tests that included it produced a pupil and separate teeth." With the skin close-up as the texture image, the mesh was "the only model with grain and wrinkles in the mesh". In the walkthrough Ryan runs the same tool on the red figure's boot, stamped RY Toys: "They're insanely detailed."
From the views to the print
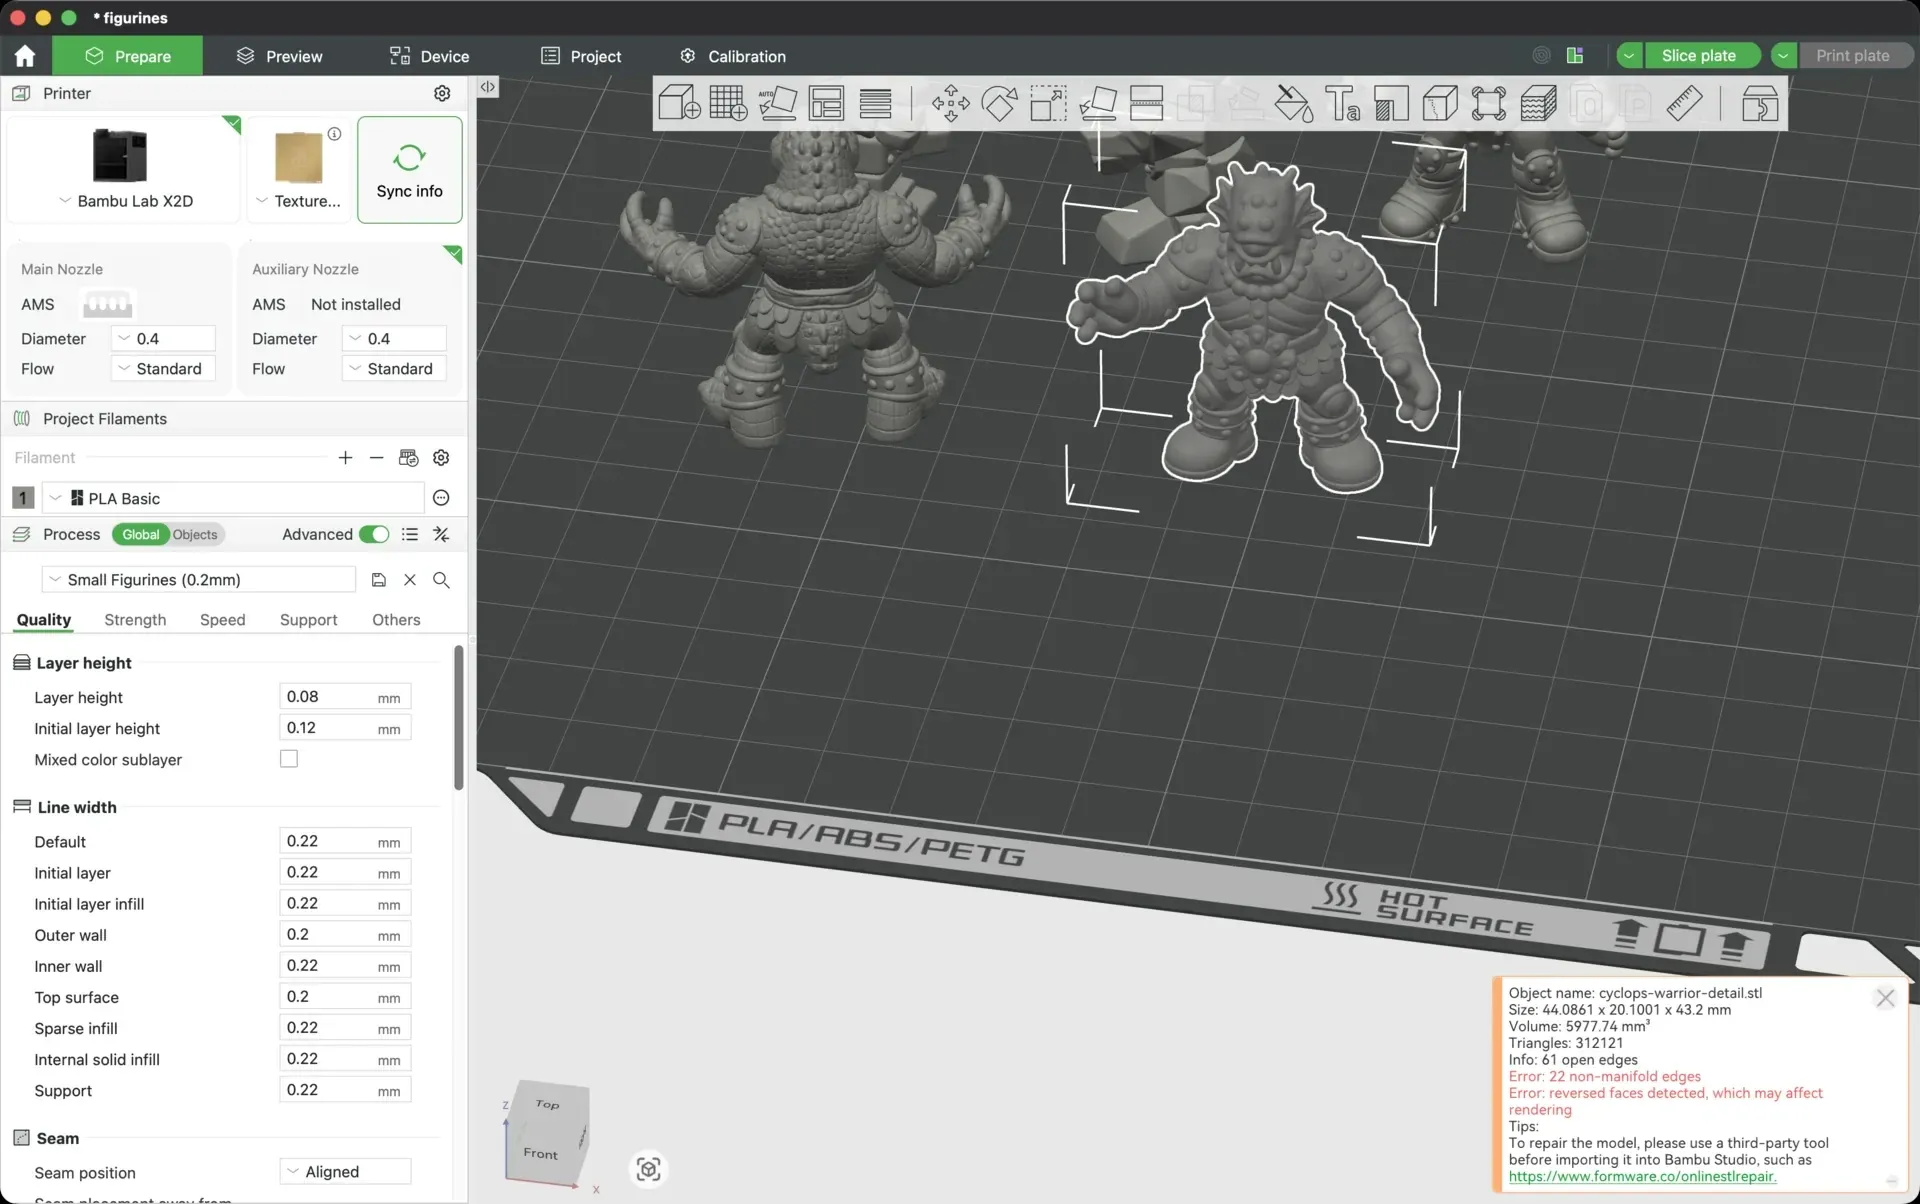
The rest happened outside Plnty, and Ryan's article walks through it. Meshy's multi-image reconstruction, run through Higgsfield, turned the three views into a textured GLB; a repair pass, done today by Ryan's own free tool Polymend, made it a file a slicer accepts; Bambu Studio sliced it at 43.2 mm, the M.U.S.C.L.E. Men scale, and a Bambu X2D printed it in PLA. "A successful export and a convincing reconstruction are different milestones," Ryan writes, and the first routes made files before they made the character.
Expert view
My favorite part is how far the original image traveled. A little creature on a canvas became something I could turn around in Blender, hold in my hand, and scatter across a website.
 Ryan HaighDesigner and builder, heyhaigh.ai
03 / The figures
New characters from a few words
Once the first three worked, new characters came from a few words on the same card. "it should be a big castle man with arms and legs" made the castle man on 4 October; "alligator man" and a Crocodile Man prompt made the crocodile on 5 October; "wrestler with cape" made the caped wrestler on 6 October. Small edits shaped each one ("reduce hand size 15%", "shorter tail", "smaller cape, evil smile"), and variations tried other directions along one axis at a time: shape, proportions, or the figure built from primitive shapes.
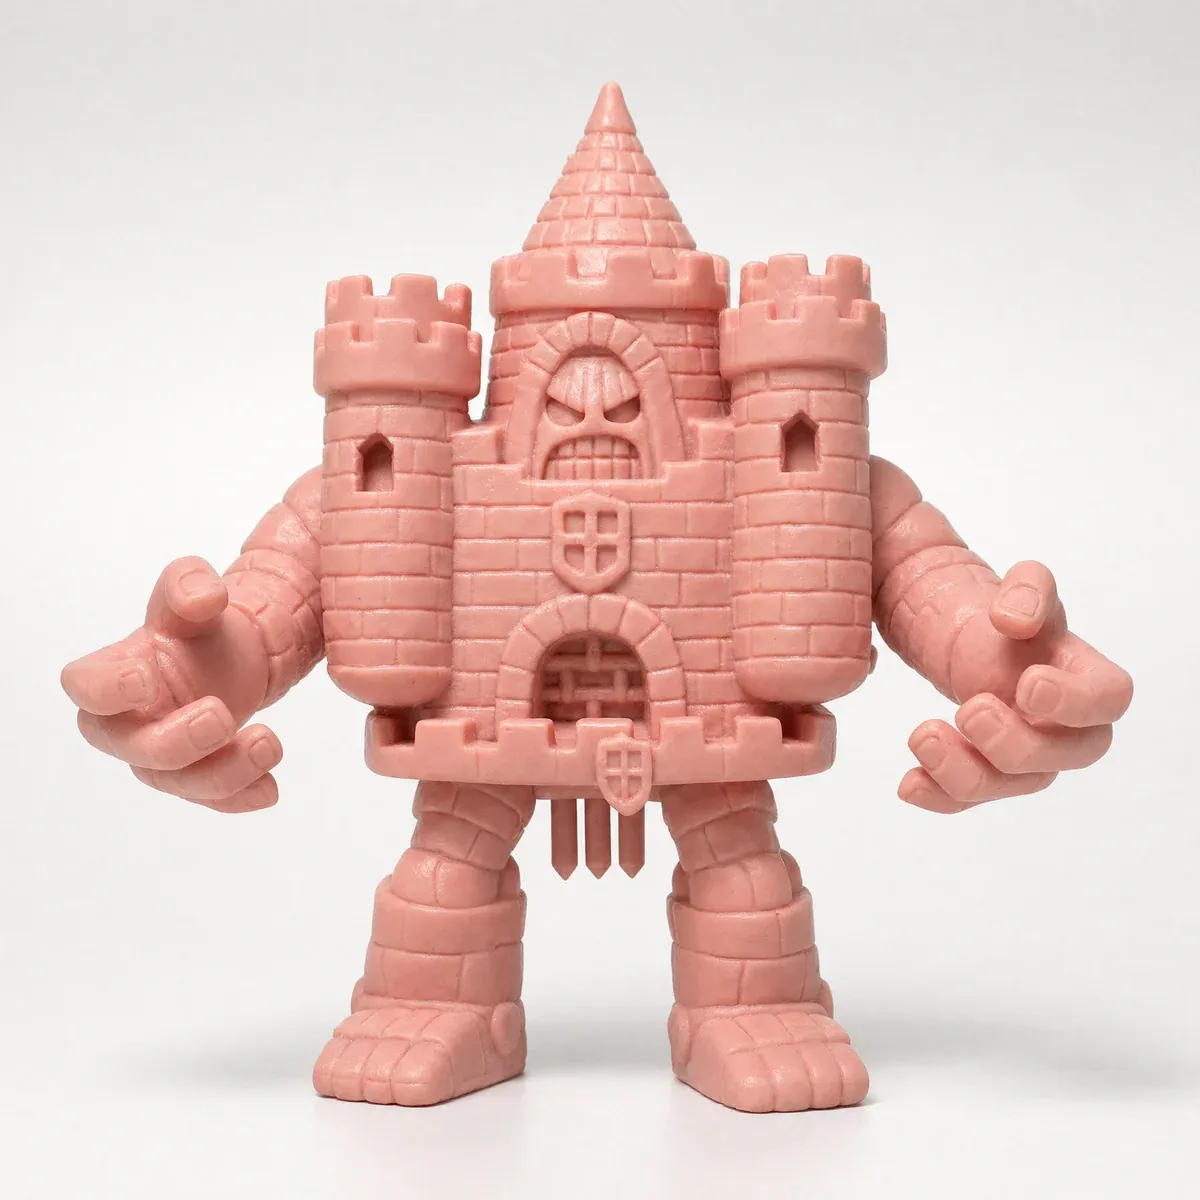
The castle man"it should be a big castle man with arms and legs", 4 October 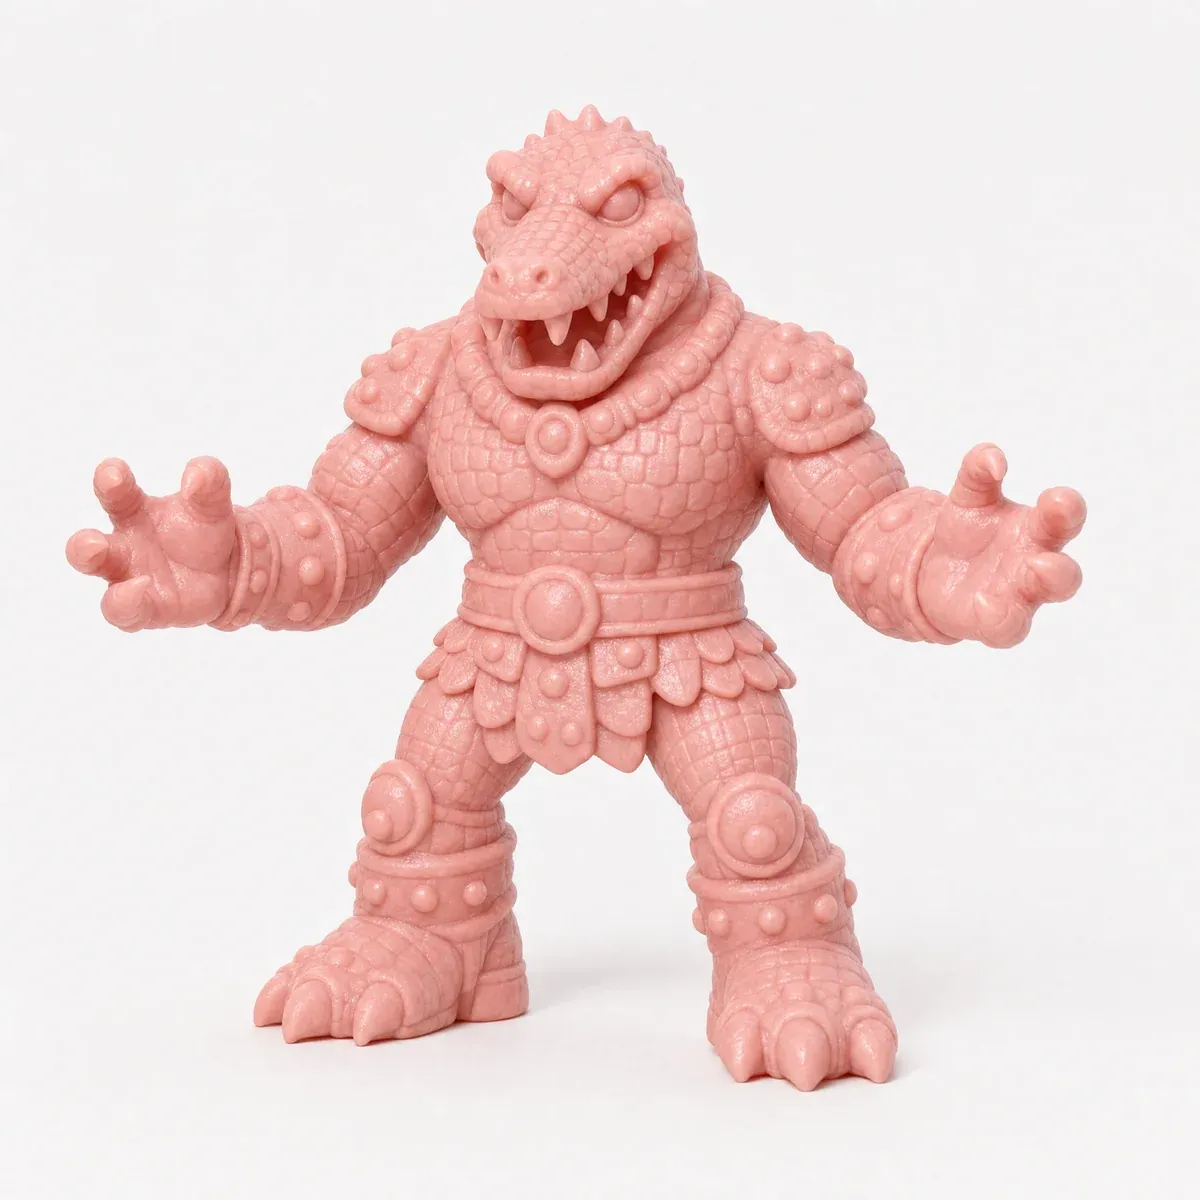
The crocodile man"Crocodile Man", 5 October 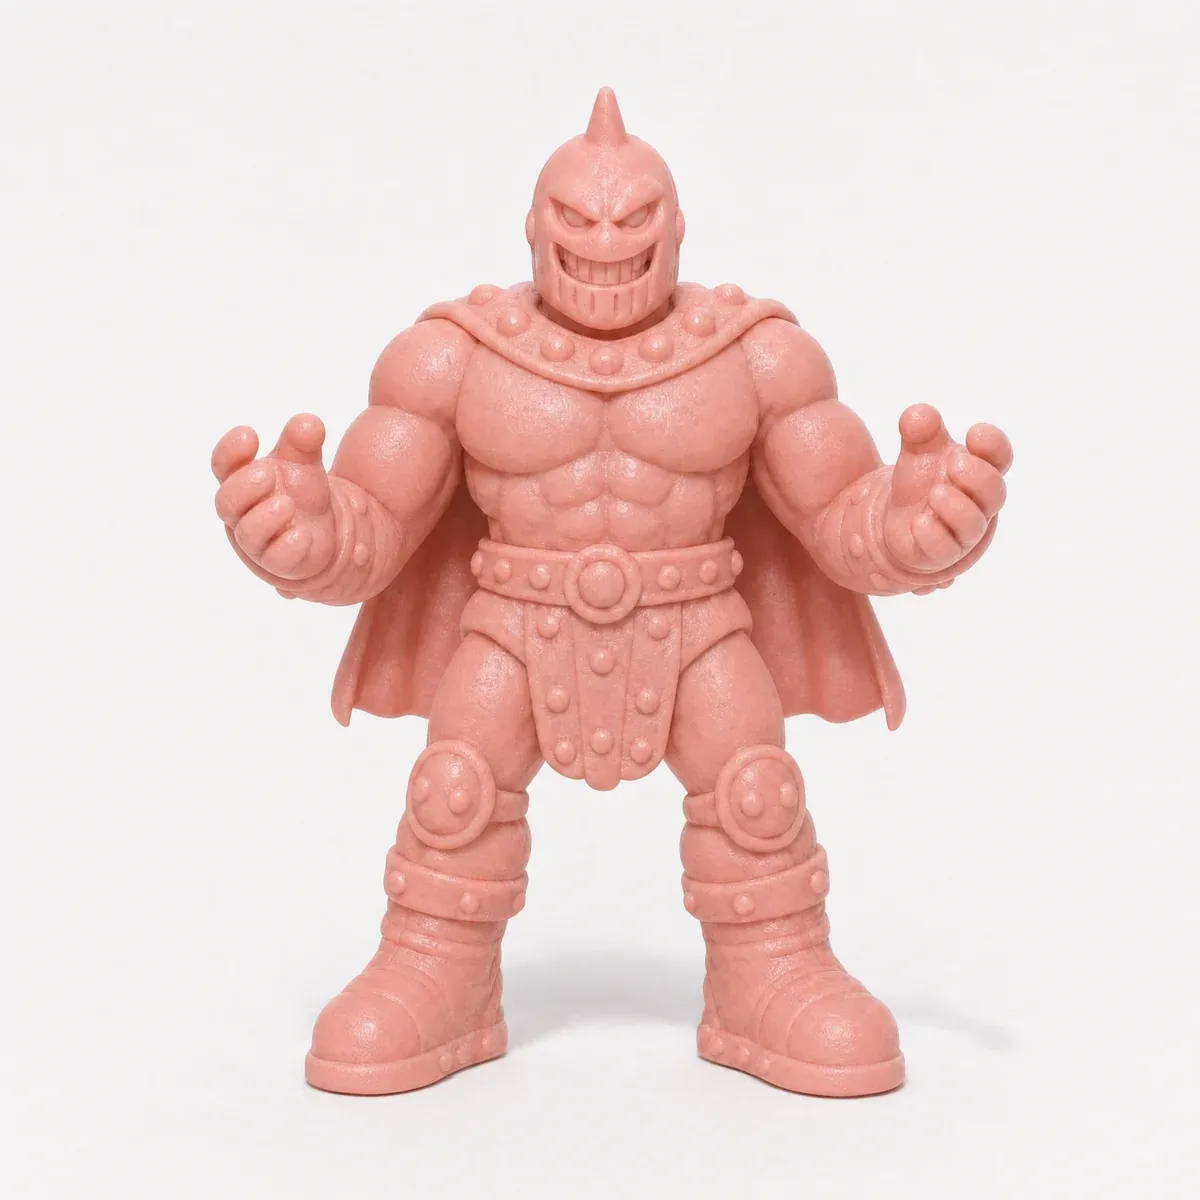
The caped wrestler"wrestler with cape", then "smaller cape, evil smile", 6 October 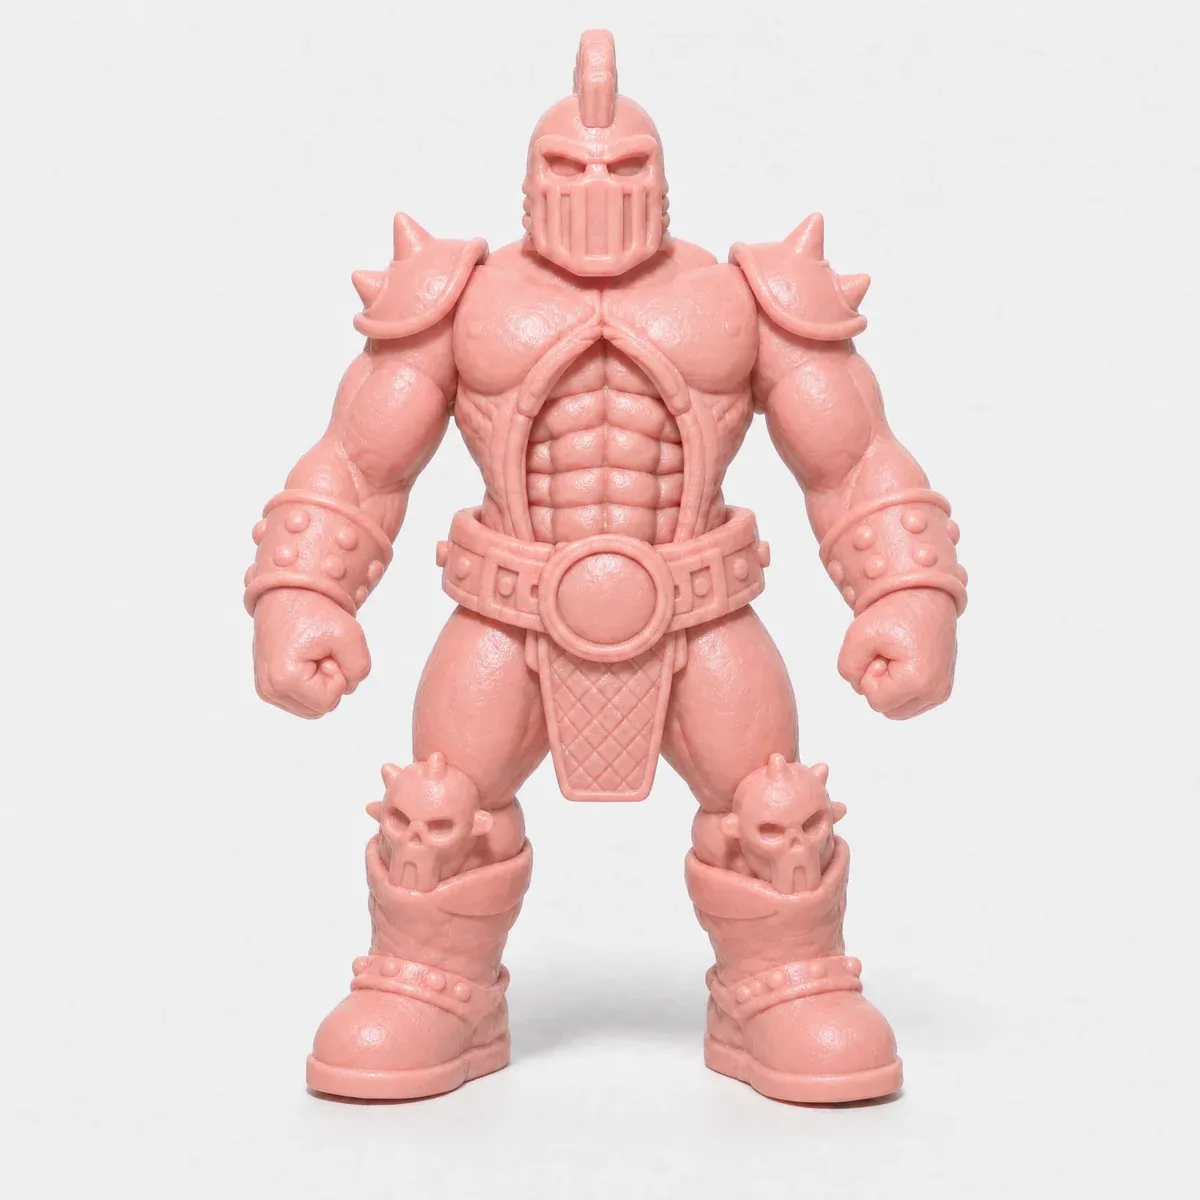
The mohawk wrestler"closed fists, mohawk, chunky belt buckle with no skull", 6 October
Printed at 43.2 mm
By 9 October about ten of the characters stood printed in Ryan's hand, posted on X as "Progress 💪", with the castle man and the crocodile among them. Layer lines show at this size, and in Ryan's words about the first three, "the characters made the trip: I can recognize the faces and armor, and hold all three figures in one hand."
04 / For makers
Running it yourself
The same route runs in Plnty today. A request to Rothko sets up a card and writes its words, and it waits for you to press Run. A result's Steps rebuild into a chain that runs the same edits on a new figure, image-gen can make a figure's side and back from its front, and close-ups pulls out the detail a 3D model can take as a fourth view. The step Ryan ran outside is on Plnty's 3D rail too: tripo-multiview builds a model from a front view with side and back views, and meshy-multiview from up to four pictures of one object, Meshy's multi-image reconstruction.
265 results, 19 tools
How do you turn an AI image into a 3D print?
Ryan's route was four steps: three views of one character from the front, side and back, made in Plnty; a multi-image 3D reconstruction (Meshy, through Higgsfield); a repair pass for the edges a slicer flags (Polymend); then the slicer, at 43.2 mm in PLA. In Plnty, tripo-multiview and meshy-multiview build the model from the views on the same board.
What reference images does image to 3D need?
Separate front, side and back views that agree on the pose, proportions, clothing, head shape and accessories, with simple backgrounds and the whole figure visible. A close-up of one feature as a fourth image adds detail three views can miss: in Ryan's test the face close-up gave the cyclops a pupil and separate teeth.
How do you keep a character consistent from front, side and back?
Make the side and back from the front itself, as an edit, so every view starts from the same figure: Ryan gave image-gen the front and two words, "side profile" or "back profile". Check the views against each other before sending them on, since a crown that changes between angles gives the reconstruction conflicting evidence.
Outcome and limitations
What the process achieved
About eleven characters designed on one board in five days, each with a side or back view; the first three printed at 43.2 mm, about ten by 9 October, and the same three bouncing out of the drawer on Ryan's homepage.
What required manual work
Made outside Plnty: the recolors (ChatGPT), the 3D reconstructions (Meshy, through Higgsfield), the repair (Polymend), the slicing and printing (Bambu Studio, a Bambu X2D, PLA), the halftone look on the 14 October clip and the homepage drawer.
What remained unresolved
The cyclops's test versions made with the close-ups are not printed yet, and PETG did not print as well as PLA on figures this small.
Sources and methodology
Ryan's Plnty account and its one board, retroboy: every finished result in the library and on the board, its tool, model, words, parent and time, from 22 September to 14 October 2026 (265 results; the board's starting examples of 26 August, with no run of Ryan's behind them, left out). Ryan's words and pictures: the article "3D Printing From 2D AI Outputs" (heyhaigh.ai, updated 5 October 2026) and the posts on X of 2, 9 and 14 October. Each picture the article and the posts show was matched to the file on the board by its pixels; the prints, the meshes, the repair and the recolors are Ryan's own, made outside Plnty. The walkthrough plays as posted, its words transcribed from its audio. The card film replays Ryan's own run of 2 October on the card as Plnty draws it today, made in Figma.
About the author

Make your next character in Plnty
Start from a sketch or a reference, ask Rothko for the first figure, then give it a side and a back.