How to guide and remix AI images in Plnty
Explore visual directions, reshape a scene and refine a selected image with references and purpose-built creative tools.

In this article
To guide and remix AI images in Plnty, start with a source image and visual references, revise the scene you want to create, compare variations, then edit the result you choose. This guide follows an animal illustration from a simple starting point through visual exploration to an object and background edit.
On this page
Start with a direction worth exploring
An image can be a starting point for several ideas. Before generating more versions, decide what interests you: the colour relationships, the character shapes, the texture or the energy of the composition. These qualities become your criteria for choosing the next result.
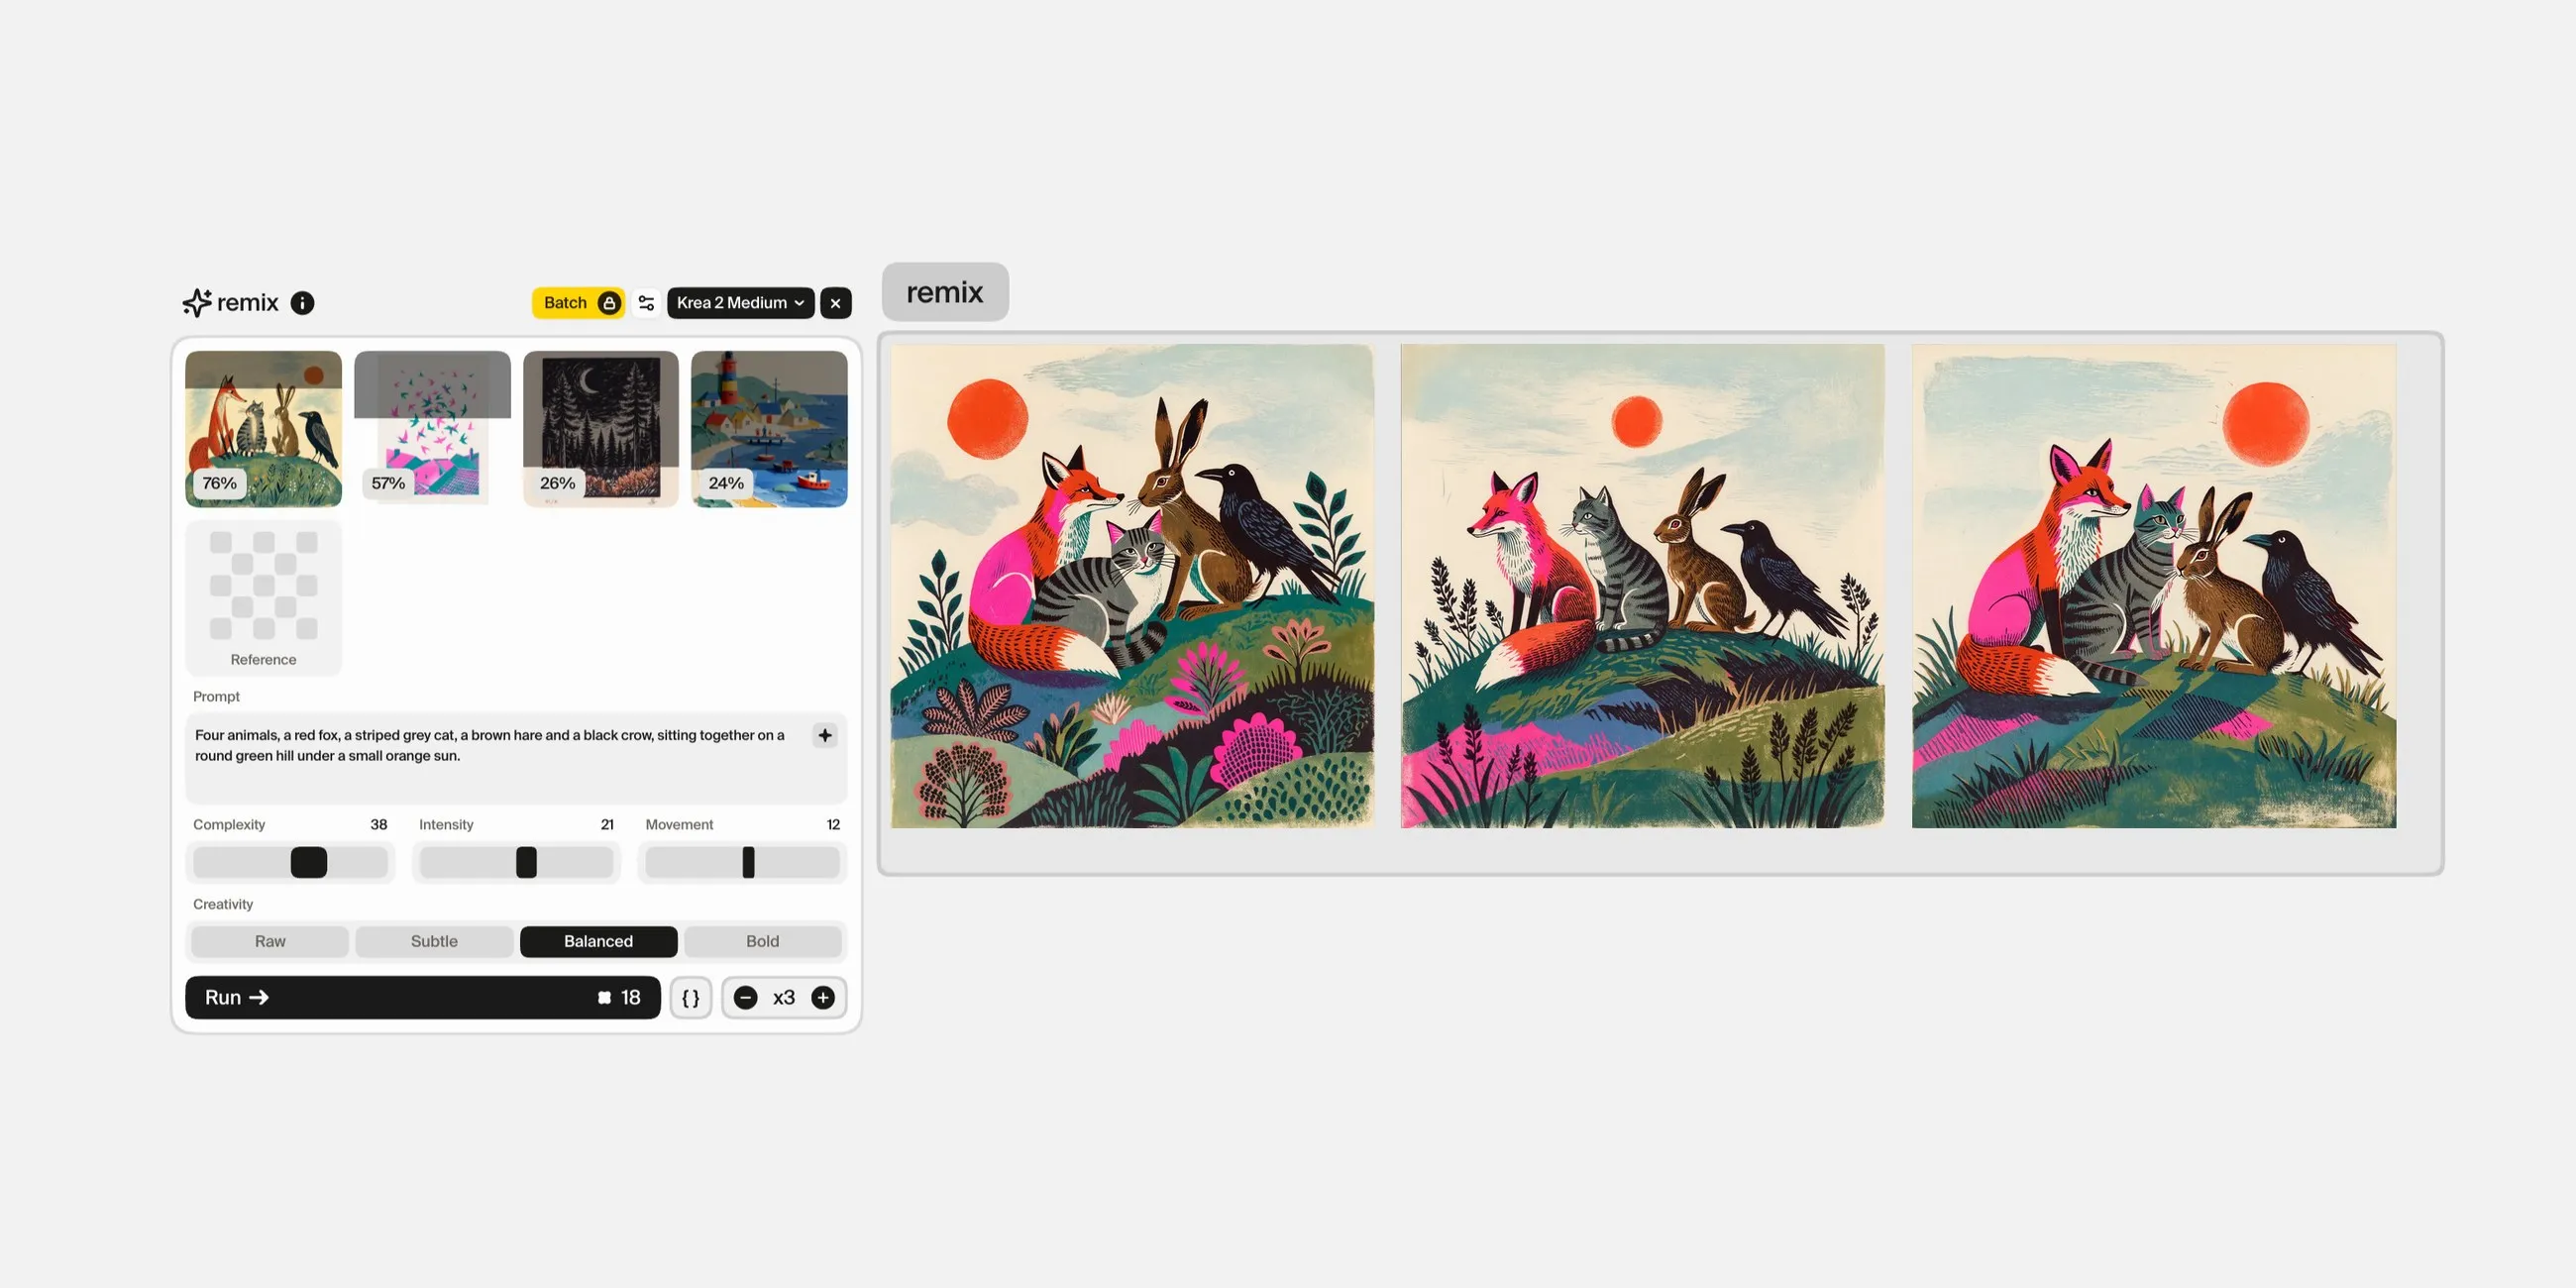
The example begins with a gouache picture-book illustration of a fox, a cat, a hare and a crow on a green hill. Three print references, a risograph, a linocut and a cut-paper collage, introduce a different visual language, while the source gives the experiment something recognisable to build on. Keep the source and references visible so you can compare the direction as it develops.
You will need a source image, references you can use, and a clear idea of what you want to change. The goal is a selected image you have actively shaped, not a guarantee that every generation will preserve the original.
1. Use references to shape the visual style
Open remix and add your source and style references. Each reference has its own influence, set by dragging up or down on its thumbnail, and the Complexity, Intensity, Movement and Creativity controls give you different ways to explore the treatment. In the example the source pulls hardest, at 76%, and the prints sit lower so they flavour the result rather than replace it.
Start with a small adjustment and inspect the result before changing several controls. For the animal illustration, the prints bring in hot pink, coarse grain and denser foliage while the four animals stay recognisable. The useful question is whether that detail strengthens the direction you want.
Judge colour, line quality, shape and detail separately. A result may keep the palette but change the character of the drawing. Keep it only if those changes serve the idea.
2. Revise the scene while keeping your visual criteria
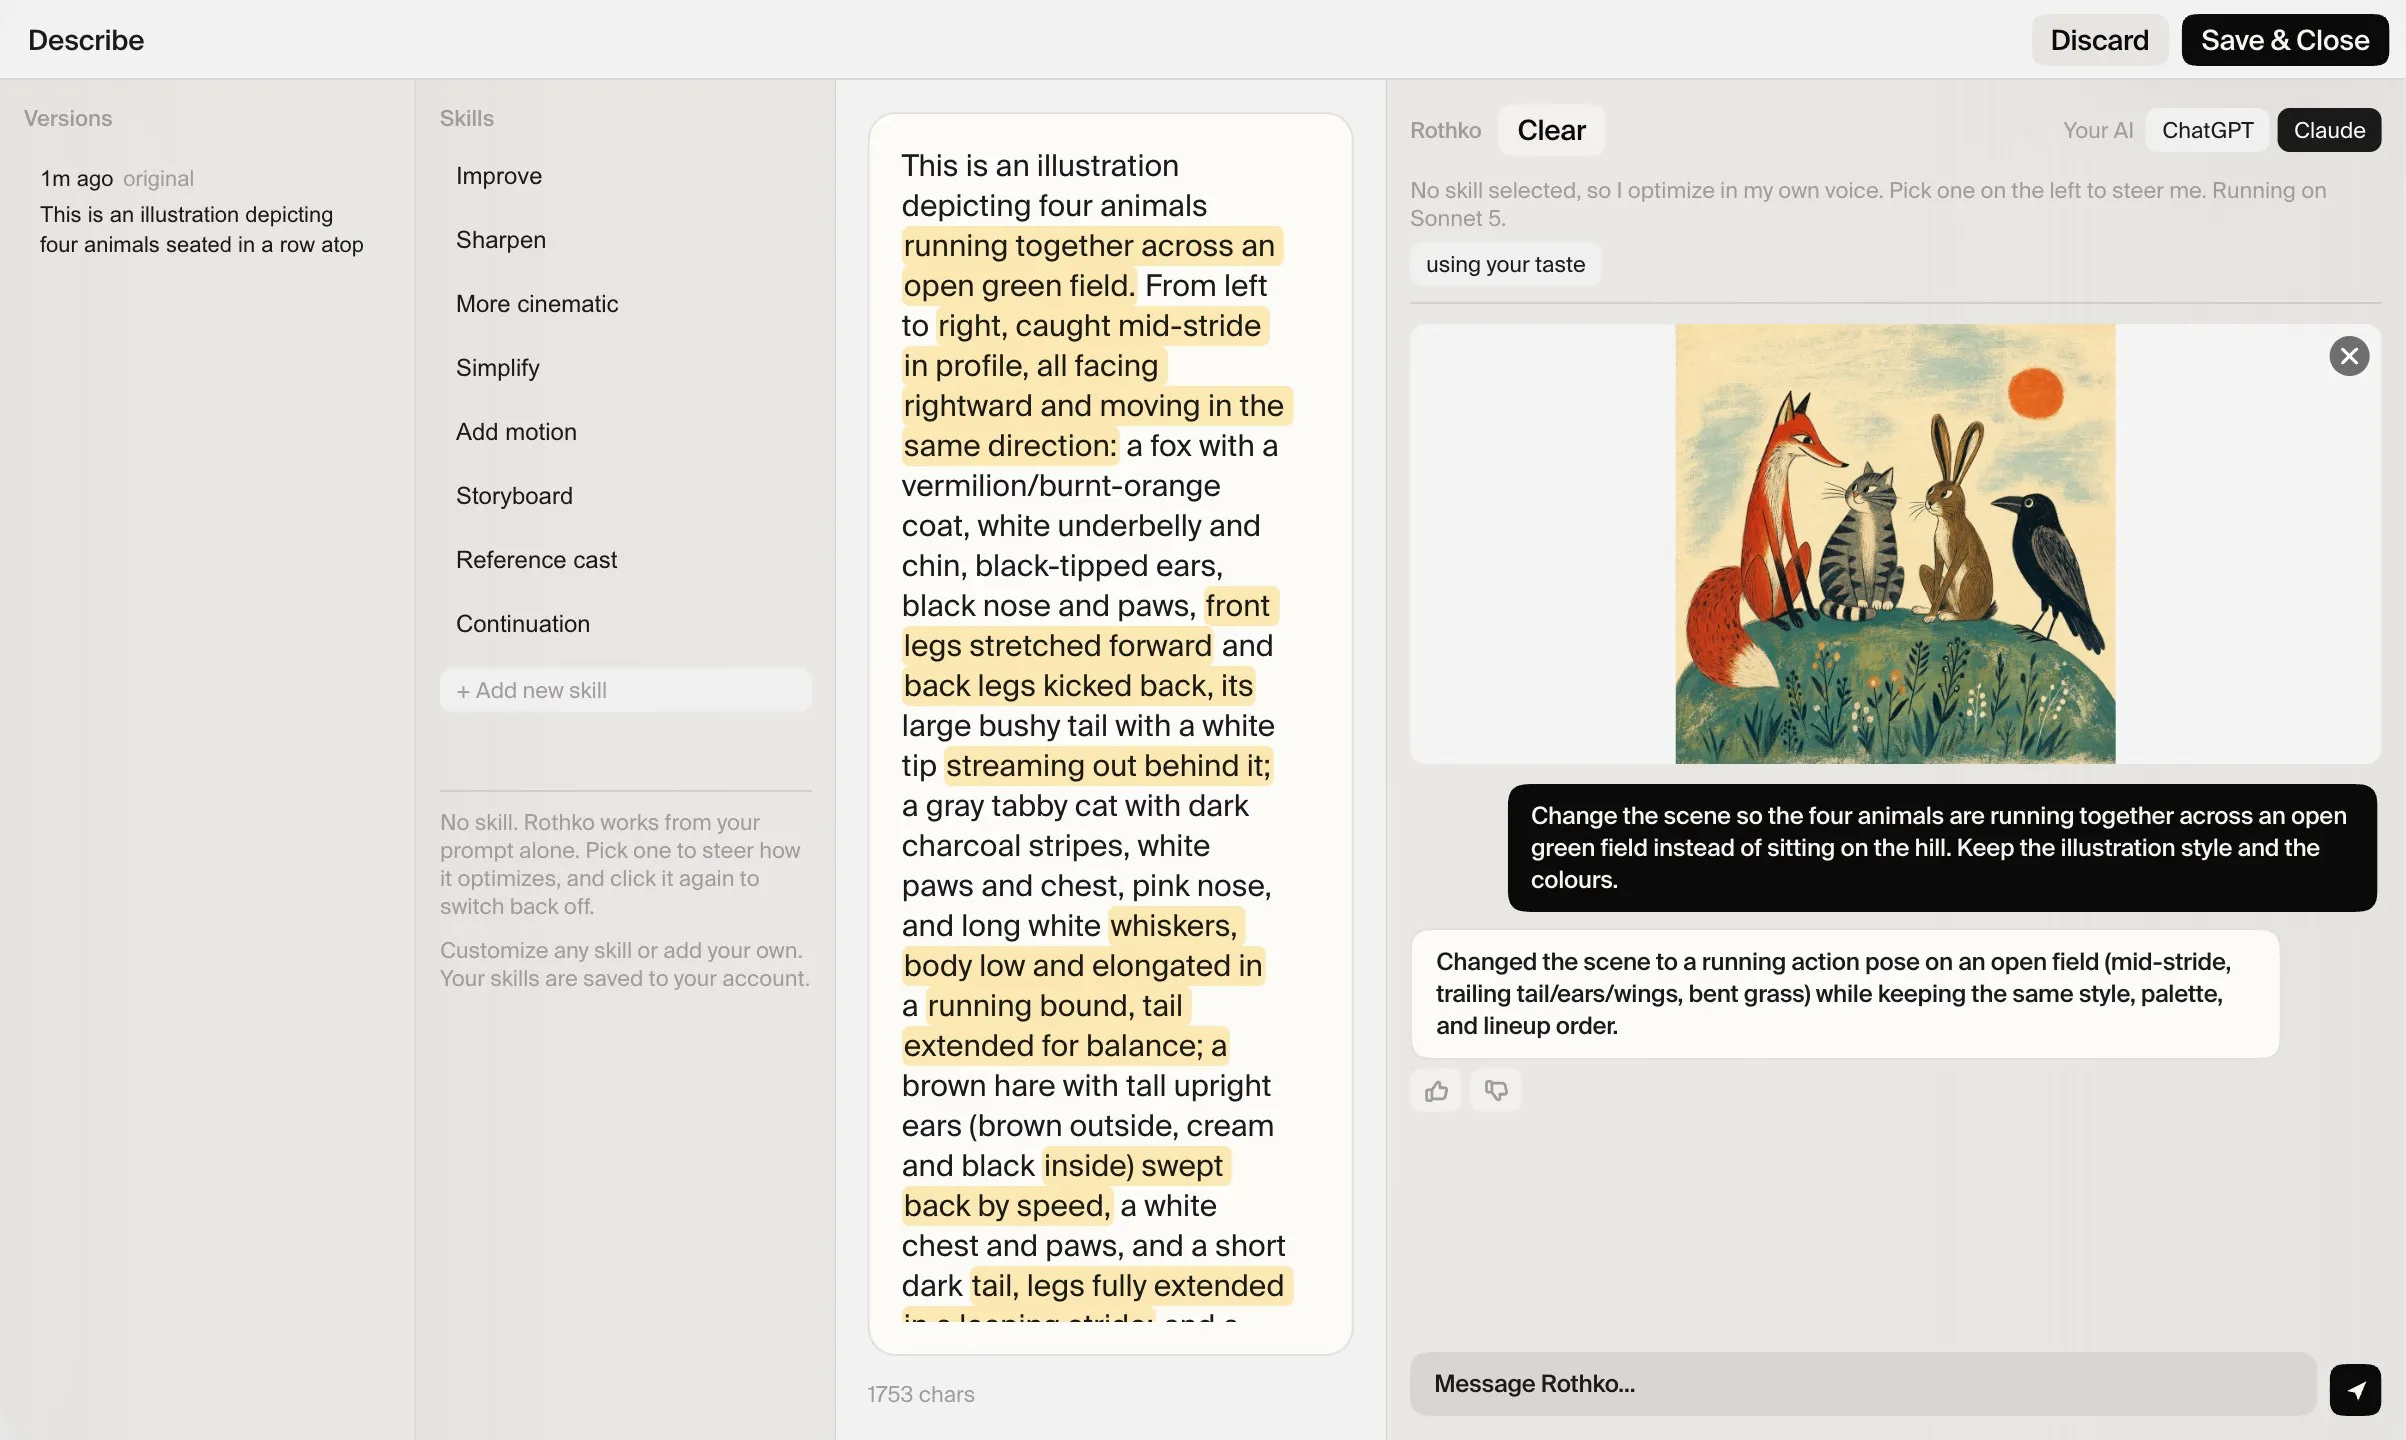
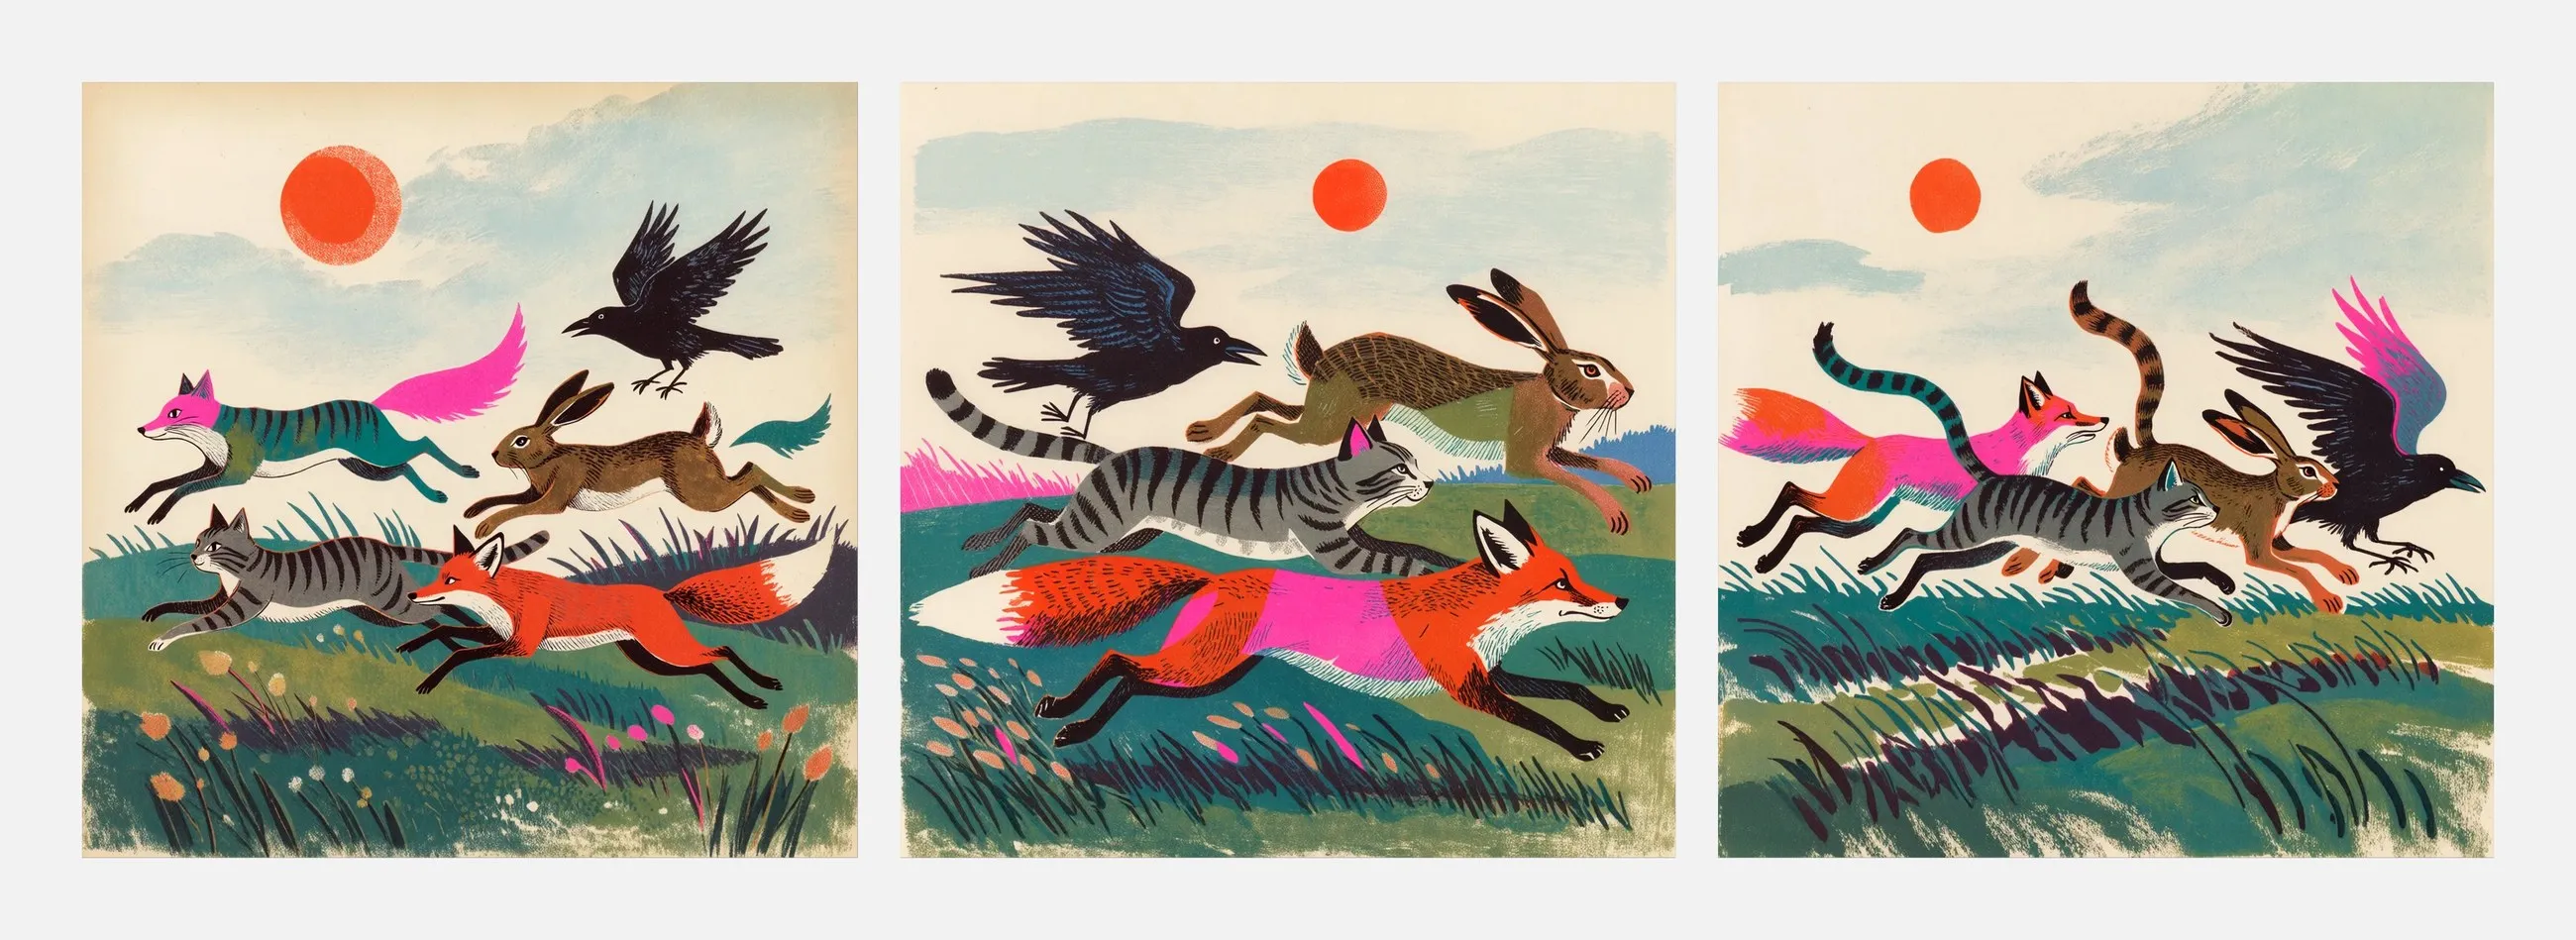
Use Describe on the source to turn it into a written description, then open the description and ask Rothko for the change. In this example, the scene changes from seated animals to a group running across an open green field. The revised description specifies the action, the animals and the visual treatment, and the editor highlights every phrase that changed.
A useful instruction names both the change and the qualities to retain. For example: “Change the scene so the four animals are running together across an open green field instead of sitting on the hill. Keep the illustration style and the colours.” This is a suggested instruction, not a guarantee of preservation.
Review the revised description before using it to generate the next set. Check that it describes what you want to make and does not introduce details that pull the image away from your direction.
3. Compare variations and choose what to keep
Place the generated images beside each other. In the running-animal variations, the palette and subject create a family resemblance, while the spacing, poses and surrounding detail vary.
Choose using the criteria you set at the start. Is the action clear? Are the animals readable? Does the added detail support the composition? Pick the version with the strongest answer to those questions.
If the direction is almost right, revise one part. If it feels exhausted, choose a tool that introduces a different kind of experiment. A useful next step should follow from what you see in the image.
Which creative tool should you use next?
explorer in Tangents mode explores alternative directions from an image. Use it when you want to discover possibilities beyond another close variation.
Its Antagonist mode challenges the current idea. Use it when you want an unexpected interpretation to react to, rather than a specific correction.
time-machine reimagines an image in a different period. Give the experiment a time direction and judge whether the resulting interpretation contains something worth developing.
These tools open up possibilities; your selection determines what continues. An unexpected result can suggest a material, shape or relationship to carry forward even when the whole image does not work.
4. Refine the selected image with a specific edit
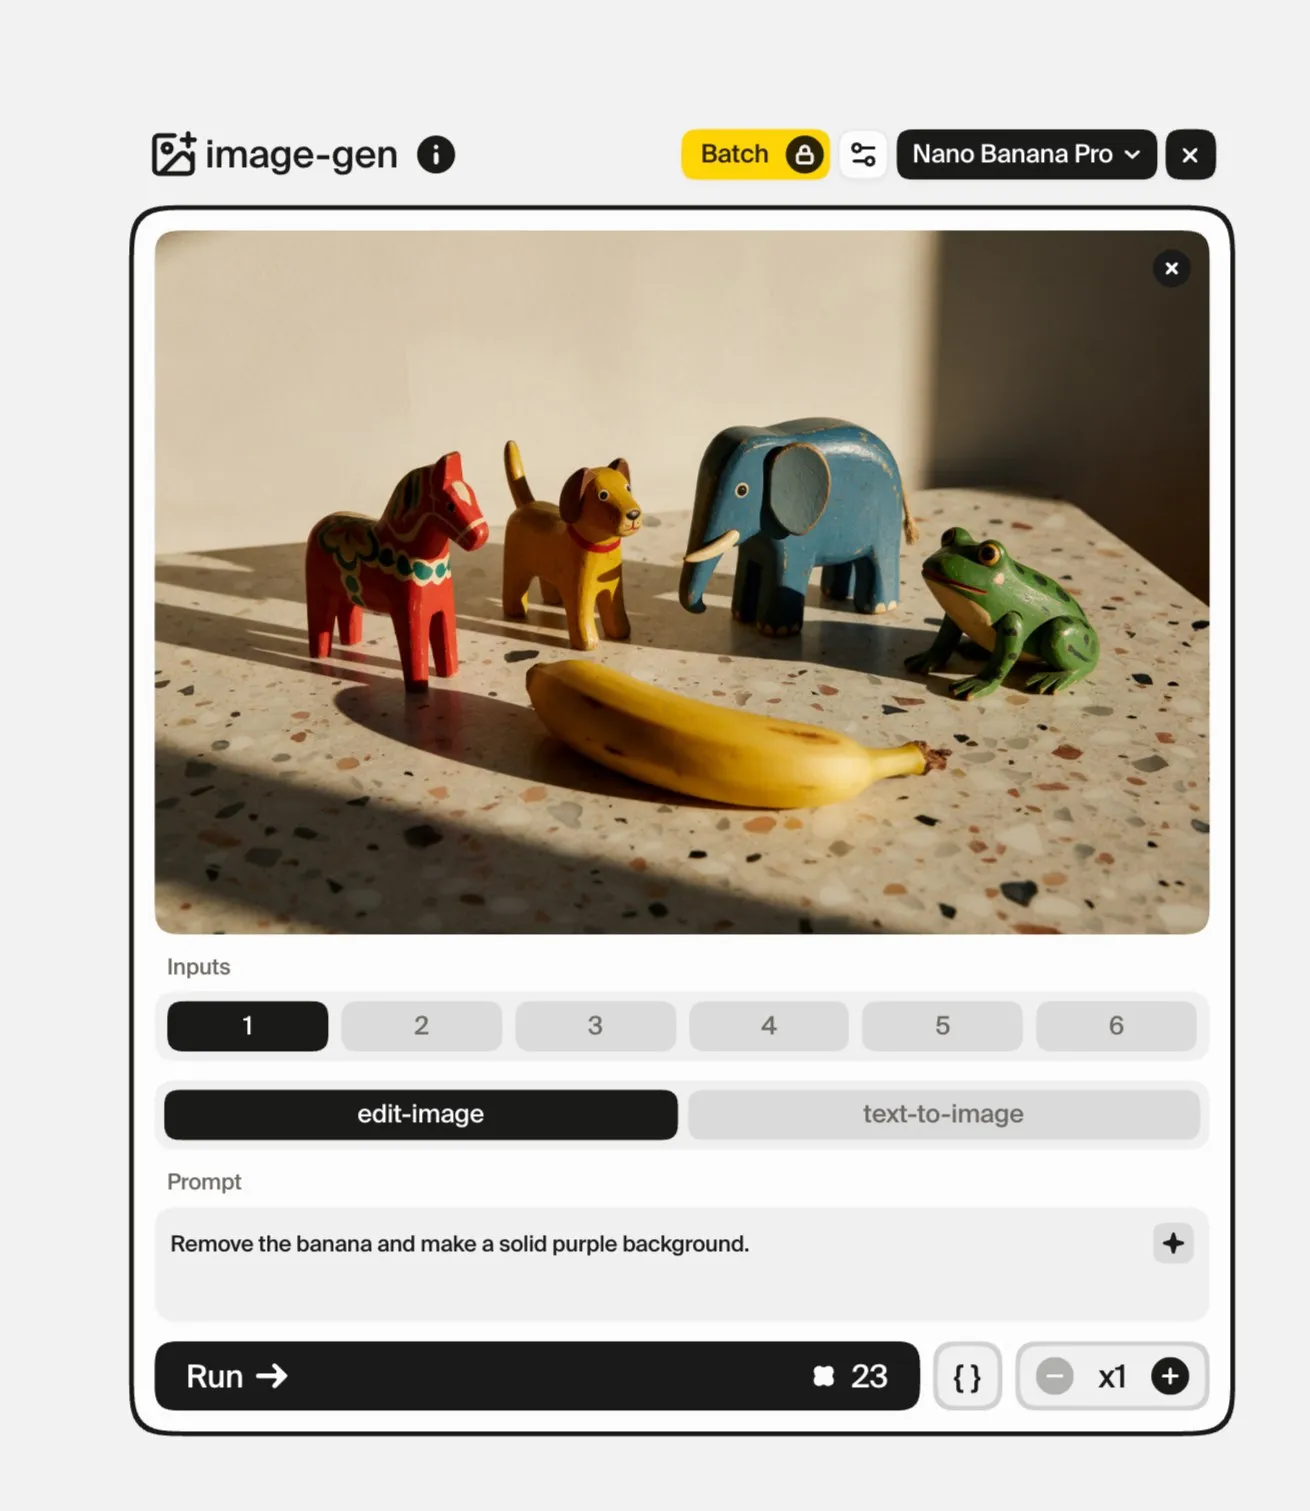
Once you have a result worth keeping, give the next generation a narrower job. The selected image below, four hand-painted wooden toy animals on a terrazzo table, has a banana in the foreground. The edit instruction is direct: “Remove the banana and make a solid purple background.”
Use the selected image as the input to image-gen in edit-image mode, enter the change and run the edit. The card below shows the image and instruction together, so the desired correction is explicit.
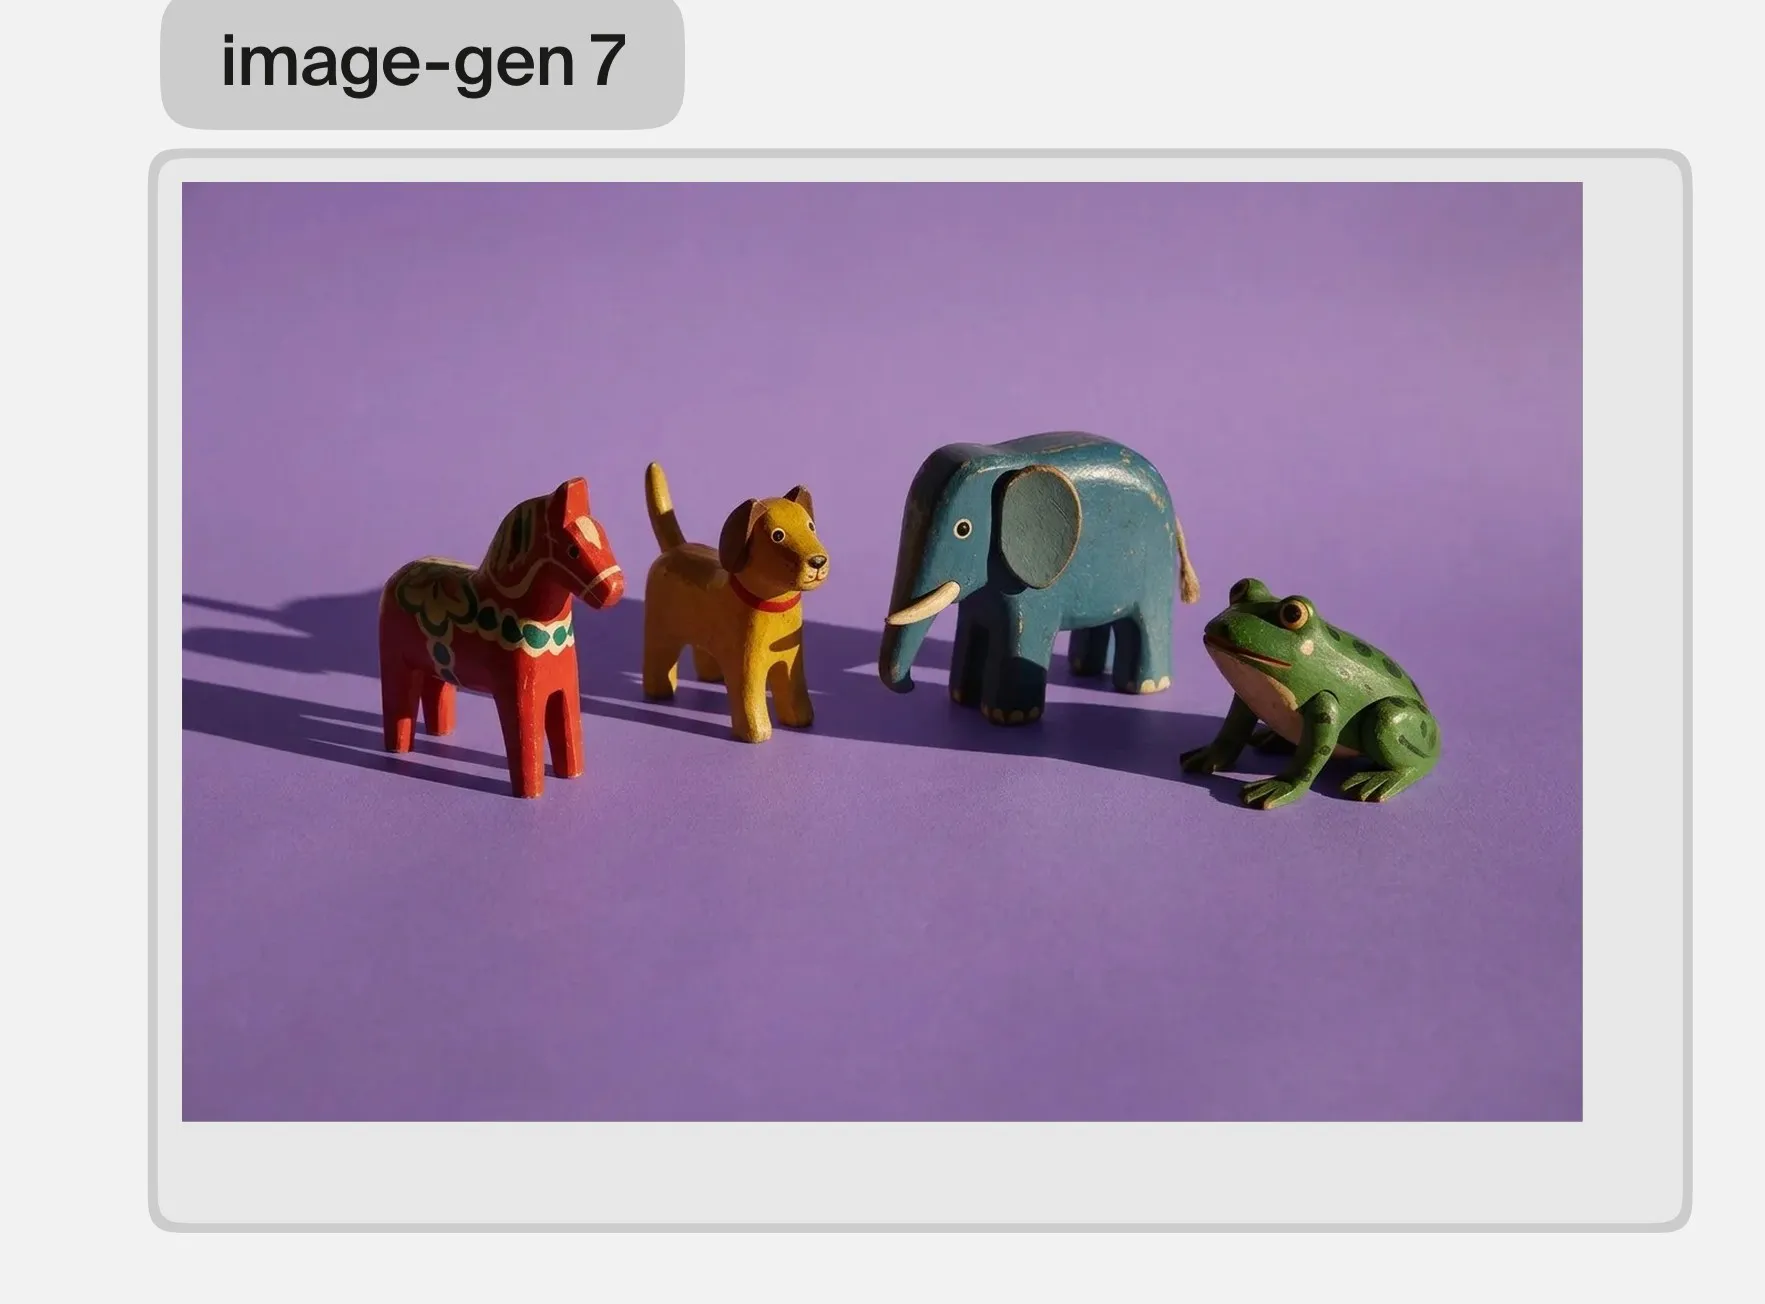
The edited result removes the banana and replaces the table and wall with a solid purple ground. Here the toys and their shadows came through intact, but the terrazzo went with the background. Check the whole output, including the animals, their edges and the composition, before treating the edit as complete.
What does creative control mean in this workflow?
Here, control means choosing the references, revising the subject and action, adjusting available creative controls, selecting an output and requesting a specific edit. Each decision gives the next step a clearer purpose.
Style continuity still needs visual review. A similar palette does not guarantee identical characters, exact poses or unchanged geometry. If a detail matters to the design, inspect it after every generation.
Use broader exploration when you need a new idea. Use a targeted edit when you know what needs to change. Keeping those decisions distinct makes it easier to judge whether a result is useful.
See the workflow in action
The optional video below walks through the same workflow in a recorded session, with its own examples. You can follow the complete process from the written steps and screenshots above.
Sources and methodology
The pictures in this guide were made in Plnty on 4 October 2026 with the tools and settings each card shows. The video is the recorded Plnty / Wix Kyiv Design Hub session, so its interface is older than the pictures above.
About the author

Try it with one image
Choose one image and write down two qualities you want to keep and one thing you want to change. Generate a small set of variations, compare them against those criteria, then select one image and make a specific correction.
Keep the source, variations and edited result together. That gives you a visible record of the direction you explored and the choices that shaped it.
Open Plnty and give your next image one clear creative decision.